Redux 要点,第 3 部分:基本 Redux 数据流
-
如何在 React 应用中设置 Redux 存储
¥How to set up a Redux store in a React application
-
如何使用
createSlice将 reducer 逻辑的 "切片" 添加到 Redux 存储¥How to add "slices" of reducer logic to the Redux store with
createSlice -
使用
useSelector钩子读取组件中的 Redux 数据¥Reading Redux data in components with the
useSelectorhook -
使用
useDispatch钩子在组件中分派操作¥Dispatching actions in components with the
useDispatchhook
-
熟悉关键 Redux 术语和概念,例如 "actions"、"reducers"、"store" 和 "dispatching"。(有关这些术语的解释,请参阅 第 1 部分:Redux 概述和概念。)
¥Familiarity with key Redux terms and concepts like "actions", "reducers", "store", and "dispatching". (See Part 1: Redux Overview and Concepts for explanations of these terms.)
-
对 TypeScript 语法和用法 的基本了解
¥Basic understanding of TypeScript syntax and usage
介绍
¥Introduction
在 第 1 部分:Redux 概述和概念 中,我们研究了 Redux 如何通过为我们提供一个放置全局应用状态的单一中心位置来帮助我们构建可维护的应用。我们还讨论了 Redux 的核心概念,例如分派操作对象、使用返回新状态值的 reducer 函数以及使用 thunk 编写异步逻辑。在 第 2 部分:Redux 工具包应用结构 中,我们看到了 Redux Toolkit 中的 configureStore 和 createSlice 以及 React-Redux 中的 Provider 和 useSelector 等 API 如何协同工作,让我们编写 Redux 逻辑并与 React 组件中的逻辑进行交互。
¥In Part 1: Redux Overview and Concepts, we looked at how Redux can help us build maintainable apps by giving us a single central place to put global app state. We also talked about core Redux concepts like dispatching action objects, using reducer functions that return new state values, and writing async logic using thunks. In Part 2: Redux Toolkit App Structure, we saw how APIs like configureStore and createSlice from Redux Toolkit and Provider and useSelector from React-Redux work together to let us write Redux logic and interact with that logic from our React components.
现在你已经了解了这些内容是什么,是时候将这些知识付诸实践了。我们将构建一个小型社交媒体源应用,其中将包含许多演示一些现实世界用例的功能。这将帮助你了解如何在自己的应用中使用 Redux。
¥Now that you have some idea of what these pieces are, it's time to put that knowledge into practice. We're going to build a small social media feed app, which will include a number of features that demonstrate some real-world use cases. This will help you understand how to use Redux in your own applications.
我们将使用 TypeScript 语法编写代码。你可以将 Redux 与纯 JavaScript 一起使用,但使用 TypeScript 有助于避免许多常见错误,为你的代码提供内置文档,并让你的编辑器向你展示在 React 组件和 Redux Reducer 等地方需要哪些变量类型。我们强烈建议所有 Redux 应用都使用 TypeScript。
¥We'll be using TypeScript syntax to write our code. You can use Redux with plain JavaScript, but using TypeScript helps prevent many common mistakes, provides built-in documentation for your code, and lets your editor show you what variable types are needed in places like React components and Redux reducers. We strongly recommend using TypeScript for all Redux applications.
该示例应用并不意味着是一个完整的生产就绪项目。目标是帮助你学习 Redux API 和典型使用模式,并使用一些有限的示例为你指明正确的方向。此外,我们构建的一些早期作品稍后将进行更新,以展示更好的做事方法。请通读整个教程以了解所有使用的概念。
¥The example app is not meant as a complete production-ready project. The goal is to help you learn the Redux APIs and typical usage patterns, and point you in the right direction using some limited examples. Also, some of the early pieces we build will be updated later on to show better ways to do things. Please read through the whole tutorial to see all the concepts in use.
项目设置
¥Project Setup
在本教程中,我们创建了一个预配置的入门项目,该项目已经设置了 React 和 Redux,包括一些默认样式,并且有一个假 REST API,允许我们在应用中编写实际的 API 请求。你将使用它作为编写实际应用代码的基础。
¥For this tutorial, we've created a pre-configured starter project that already has React and Redux set up, includes some default styling, and has a fake REST API that will allow us to write actual API requests in our app. You'll use this as the basis for writing the actual application code.
首先,你可以打开并分叉此 CodeSandbox:
¥To get started, you can open and fork this CodeSandbox:
你也可以 从这个 Github 存储库克隆相同的项目。该项目配置为使用 Yarn 4 作为包管理器,但你可以根据需要使用任何包管理器(NPM、PNPM 或 Bun)。安装软件包后,你可以使用 yarn dev 命令启动本地开发服务器。
¥You can also clone the same project from this Github repo. The project is configured to use Yarn 4 as the package manager, but you can use any package manager (NPM, PNPM, or Bun) as you prefer. After installing packages, you can start the local dev server with the yarn dev command.
如果你想查看我们将要构建的最终版本,你可以查看 tutorial-steps-ts 分行 或 看看这个 CodeSandbox 中的最终版本。
¥If you'd like to see the final version of what we're going to build, you can check out the tutorial-steps-ts branch, or look at the final version in this CodeSandbox.
我们要感谢 塔尼亚·拉西亚,他的 将 Redux 与 React 结合使用 教程为本页面中的示例提供了启发。它还使用了她的 原始 UI CSS 启动器 进行样式。
¥We'd like to thank Tania Rascia, whose Using Redux with React tutorial helped inspire the example in this page. It also uses her Primitive UI CSS starter for styling.
创建一个新的 Redux + React 项目
¥Creating a New Redux + React Project
完成本教程后,你可能会想要尝试处理自己的项目。我们建议使用 Vite 和 Next.js 的 Redux 模板 作为创建新 Redux + React 项目的最快方式。模板附带已配置的 Redux Toolkit 和 React-Redux,使用 你在第 1 部分中看到的相同 "counter" 应用示例。这使你可以直接编写实际的应用代码,而无需添加 Redux 包并设置存储。
¥Once you've finished this tutorial, you'll probably want to try working on your own projects. We recommend using the Redux templates for Vite and Next.js as the fastest way to create a new Redux + React project. The templates come with Redux Toolkit and React-Redux already configured, using the same "counter" app example you saw in Part 1. This lets you jump right into writing your actual application code without having to add the Redux packages and set up the store.
探索初始项目
¥Exploring the Initial Project
让我们快速浏览一下初始项目包含的内容:
¥Let's take a quick look at what the initial project contains:
-
/public:基本 CSS 样式和其他静态文件(如图标)¥
/public: base CSS styles and other static files like icons -
/src-
main.tsx:应用的入口点文件,用于渲染<App>组件。在此示例中,它还在页面加载时设置了假 REST API。¥
main.tsx: the entry point file for the application, which renders the<App>component. In this example, it also sets up the fake REST API on page load. -
App.tsx:主要应用组件。渲染顶部导航栏并处理其他内容的客户端路由。¥
App.tsx: the main application component. Renders the top navbar and handles client-side routing for the other content. -
index.css:完整应用的样式¥
index.css: styles for the complete application -
/api-
client.ts:一个小型fetch封装器客户端,允许我们发出 HTTP GET 和 POST 请求¥
client.ts: a smallfetchwrapper client that allows us to make HTTP GET and POST requests -
server.ts:为我们的数据提供一个虚假的 REST API。我们的应用稍后将从这些虚假端点获取数据。¥
server.ts: provides a fake REST API for our data. Our app will fetch data from these fake endpoints later.
-
-
/app-
Navbar.tsx:渲染顶部标题和导航内容¥
Navbar.tsx: renders the top header and nav content
-
-
如果现在加载应用,你应该会看到标题和欢迎消息,但没有功能。
¥If you load the app now, you should see the header and a welcome message, but no functionality.
就这样,我们开始吧!
¥With that, let's get started!
设置 Redux 存储
¥Setting Up the Redux Store
现在项目是空的,所以我们需要先对 Redux 部分进行一次性设置。
¥Right now the project is empty, so we'll need to start by doing the one-time setup for the Redux pieces.
添加 Redux 包
¥Adding the Redux Packages
如果你查看 package.json,你会发现我们已经安装了使用 Redux 所需的两个软件包:
¥If you look at package.json, you'll see that we've already installed the two packages needed to use Redux:
-
@reduxjs/toolkit:现代 Redux 包,其中包括我们将用于构建应用的所有 Redux 功能¥
@reduxjs/toolkit: the modern Redux package, which includes all the Redux functions we'll be using to build the app -
react-redux:让你的 React 组件与 Redux 存储对话所需的功能¥
react-redux: the functions needed to let your React components talk to a Redux store
如果你从头开始设置项目,请先自己将这些包添加到项目中。
¥If you're setting up a project from scratch, start by adding those packages to the project yourself.
创建存储
¥Creating the Store
第一步是创建一个实际的 Redux 存储。Redux 的原则之一是整个应用应该只有一个存储实例。
¥The first step is to create an actual Redux store. One of the principles of Redux is that there should only be one store instance for an entire application.
我们通常在其自己的文件中创建和导出 Redux 存储实例。应用的实际文件夹结构由你决定,但在 src/app/ 文件夹中进行应用范围的设置和配置是标准做法。
¥We typically create and export the Redux store instance in its own file. The actual folder structure for the application is up to you, but it's standard to have application-wide setup and configuration in a src/app/ folder.
我们将首先添加一个 src/app/store.ts 文件并创建存储。
¥We'll start by adding a src/app/store.ts file and creating the store.
Redux Toolkit 包含一个名为 configureStore 的方法。此函数创建一个新的 Redux 存储实例。它有几个选项可以传入以更改存储的行为。它还会自动应用最常见和最有用的配置设置,包括检查典型错误,并启用 Redux DevTools 扩展,以便你可以查看状态内容和操作历史记录。
¥Redux Toolkit includes a method called configureStore. This function creates a new Redux store instance. It has several options that you can pass in to change the store's behavior. It also applies the most common and useful configuration settings automatically, including checking for typical mistakes, and enabling the Redux DevTools extension so that you can view the state contents and action history.
import { configureStore } from '@reduxjs/toolkit'
import type { Action } from '@reduxjs/toolkit'

interface CounterState {
  value: number
}

// An example slice reducer function that shows how a Redux reducer works inside.
// We'll replace this soon with real app logic.
function counterReducer(state: CounterState = { value: 0 }, action: Action) {
  switch (action.type) {
    // Handle actions here
    default: {
      return state
    }
  }
}

export const store = configureStore({
  // Pass in the root reducer setup as the `reducer` argument
  reducer: {
    // Declare that `state.counter` will be updated by the `counterReducer` function
    counter: counterReducer
  }
})
configureStore 始终需要 reducer 选项。这通常应该是一个包含应用不同部分的单独 "切片 reducer" 的对象。(如有必要,你还可以单独创建根 Reducer 函数并将其作为 reducer 参数传递。)
¥configureStore always requires a reducer option. This should typically be an object containing the individual "slice reducers" for the different parts of the application. (If necessary, you can also create the root reducer function separately and pass that as the reducer argument.)
对于第一步,我们传入一个模拟切片 Reducer 函数用于 counter 切片,以显示设置的样子。我们将在一分钟内将其替换为我们想要构建的实际应用的真实切片缩减器。
¥For this first step, we're passing in a mock slice reducer function for the counter slice, to show what the setup looks like. We'll replace this with a real slice reducer for the actual app we want to build in just a minute.
如果你使用的是 Next.js,则设置过程需要更多步骤。有关如何使用 Next.js 设置 Redux 的详细信息,请参阅 使用 Next.js 设置 页面。
¥If you're using Next.js, the setup process takes a few more steps. See the Setup with Next.js page for details on how to set up Redux with Next.js.
提供存储
¥Providing the Store
Redux 本身是一个普通的 JS 库,可以与任何 UI 层一起使用。在这个应用中,我们使用 React,所以我们需要一种方法让我们的 React 组件与 Redux 存储交互。
¥Redux by itself is a plain JS library, and can work with any UI layer. In this app, we're using React, so we need a way to let our React components interact with the Redux store.
为了使其工作,我们需要使用 React-Redux 库并将 Redux 存储传递到 <Provider> 组件中。这使用 React 的 Context API 使 Redux 存储可供我们应用中的所有 React 组件访问。
¥To make this work, we need to use the React-Redux library and pass the Redux store into a <Provider> component. This uses React's Context API to make the Redux store accessible to all of the React components in our application.
重要的是,我们不应该尝试将 Redux 存储直接导入其他应用代码文件!因为只有一个存储文件,直接导入存储可能会意外导致循环导入问题(文件 A 导入 B,文件 C 导入 A),从而导致难以跟踪的错误。此外,我们希望能够 为组件和 Redux 逻辑编写测试,并且这些测试将需要创建自己的 Redux 存储实例。通过 Context 向组件提供存储可以保持灵活性并避免导入问题。
¥It's important that we should not try to directly import the Redux store into other application code files! Because there's only one store file, directly importing the store can accidentally cause circular import issues (where file A imports B imports C imports A), which lead to hard-to-track bugs. Additionally, we want to be able to write tests for the components and Redux logic, and those tests will need to create their own Redux store instances. Providing the store to the components via Context keeps this flexible and avoids import problems.
为此,我们将 store 导入 main.tsx 入口点文件,用存储将 <Provider> 封装在 <App> 组件周围:
¥To do this, we'll import the store into the main.tsx entry point file, wrap a <Provider> with the store around the <App> component:
import { createRoot } from 'react-dom/client'
import { Provider } from 'react-redux'

import App from './App'
import { store } from './app/store'

// skip mock API setup

const root = createRoot(document.getElementById('root')!)

root.render(
  <React.StrictMode>
    <Provider store={store}>
      <App />
    </Provider>
  </React.StrictMode>
)
检查 Redux 状态
¥Inspecting the Redux State
现在我们有了一个存储,我们可以使用 Redux DevTools 扩展来查看当前的 Redux 状态。
¥Now that we have a store, we can use the Redux DevTools extension to view the current Redux state.
如果你打开浏览器的 DevTools 视图(例如右键单击页面中的任意位置并选择 "检查"),则可以单击 "Redux" 选项卡。这将显示分派操作的历史记录和当前状态值:
¥If you open up your browser's DevTools view (such as by right-clicking anywhere in the page and choosing "Inspect"), you can click on the "Redux" tab. This will show the history of dispatched actions and the current state value:
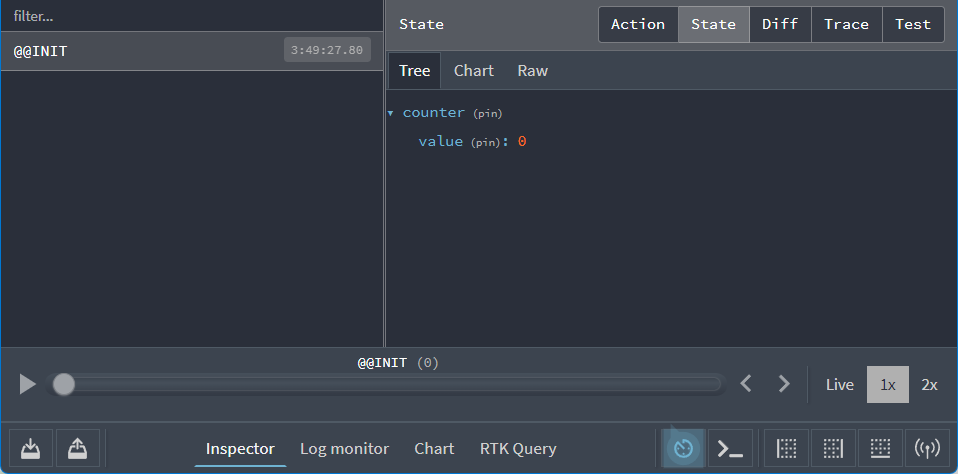
当前状态值应该是一个如下所示的对象:
¥The current state value should be an object that looks like this:
{
  counter: {
    value: 0
  }
}
该形状由我们传递给 configureStore 的 reducer 选项定义:一个对象,带有一个名为 counter 的字段,counter 字段的切片缩减器返回一个像 {value} 这样的对象作为其状态。
¥That shape was defined by the reducer option we passed into configureStore: an object, with a field named counter, and the slice reducer for the counter field returns an object like {value} as its state.
导出存储类型
¥Exporting Store Types
由于我们将频繁引用 "Redux 状态的类型" 的 TS 类型和“Redux 存储 dispatch 函数的类型”。
¥Since we're using TypeScript, we're going to frequently refer to TS types for "the type of the Redux state" and "the type of the Redux store dispatch function".
我们需要从 store.ts 文件中导出这些类型。我们将使用 TS typeof 运算符定义类型,让 TS 根据 Redux 存储定义推断类型:
¥We need to export those types from the store.ts file. We'll define the types by using the TS typeof operator to ask TS to infer the types based on the Redux store definition:
import { configureStore } from '@reduxjs/toolkit'

// omit counter slice setup

export const store = configureStore({
  reducer: {
    counter: counterReducer
  }
})

// Infer the type of `store`
export type AppStore = typeof store
// Infer the `AppDispatch` type from the store itself
export type AppDispatch = typeof store.dispatch
// Same for the `RootState` type
export type RootState = ReturnType<typeof store.getState>
如果将鼠标悬停在编辑器中的 RootState 类型上,你应该会看到 type RootState = { counter: CounterState; }。由于此类型是从存储定义自动派生的,因此对 reducer 设置的所有未来更改也将自动反映在 RootState 类型中。这样我们只需要定义一次,它就永远准确了。
¥If you hover over the RootState type in your editor, you should see type RootState = { counter: CounterState; }. Since this type is automatically derived from the store definition, all the future changes to the reducer setup will automatically be reflected in the RootState type as well. This way we only need to define it once, and it will always be accurate.
导出类型化钩子
¥Exporting Typed Hooks
我们将在我们的组件中广泛使用 React-Redux 的 useSelector 和 useDispatch 钩子。每次使用钩子时,都需要引用 RootState 和 AppDispatch 类型。
¥We're going to be using React-Redux's useSelector and useDispatch hooks extensively in our components. Those need to reference the RootState and AppDispatch types each time we use the hooks.
如果我们设置了这些钩子的 "pre-typed" 版本,并且这些钩子已经内置了正确的类型,那么我们可以简化使用并避免重复类型。
¥We can simplify the usage and avoid repeating the types if we set up "pre-typed" versions of those hooks that have the right types already built in.
React-Redux 9.1 包含 .withTypes() 方法,可将正确的类型应用于这些钩子。我们可以导出这些预先输入的钩子,然后在应用的其余部分使用它们:
¥React-Redux 9.1 includes .withTypes() methods that apply the right types to those hooks. We can export these pre-typed hooks, then use them in the rest of the application:
// This file serves as a central hub for re-exporting pre-typed Redux hooks.
import { useDispatch, useSelector } from 'react-redux'
import type { AppDispatch, RootState } from './store'

// Use throughout your app instead of plain `useDispatch` and `useSelector`
export const useAppDispatch = useDispatch.withTypes<AppDispatch>()
export const useAppSelector = useSelector.withTypes<RootState>()
这样就完成了设置过程。让我们开始构建应用!
¥That completes the setup process. Let's start building the app!
主要帖子提要
¥Main Posts Feed
我们的社交媒体源应用的主要功能是帖子列表。随着我们的进展,我们将向此功能添加更多内容,但首先,我们的第一个目标是仅在屏幕上显示帖子条目列表。
¥The main feature for our social media feed app will be a list of posts. We'll add several more pieces to this feature as we go along, but to start off, our first goal is to only show the list of post entries on screen.
创建帖子切片
¥Creating the Posts Slice
第一步是创建一个新的 Redux "slice",其中包含我们帖子的数据。
¥The first step is to create a new Redux "slice" that will contain the data for our posts.
"slice" 是应用中单个功能的 Redux reducer 逻辑和操作的集合,通常在单个文件中一起定义。这个名字来源于将根 Redux 状态对象分割成多个 "切片" 状态。
¥A "slice" is a collection of Redux reducer logic and actions for a single feature in your app, typically defined together in a single file. The name comes from splitting up the root Redux state object into multiple "slices" of state.
一旦我们在 Redux 存储中有了帖子数据,我们就可以创建 React 组件以在页面上显示该数据。
¥Once we have the posts data in the Redux store, we can create the React components to show that data on the page.
在 src 中,创建一个新的 features 文件夹,在 features 中放入 posts 文件夹,并添加一个名为 postsSlice.ts 的新文件。
¥Inside of src, create a new features folder, put a posts folder inside of features, and add a new file named postsSlice.ts.
我们将使用 Redux Toolkit createSlice 函数来创建一个 reducer 函数,它知道如何处理我们的帖子数据。Reducer 函数需要包含一些初始数据,以便 Redux 存储在应用启动时加载这些值。
¥We're going to use the Redux Toolkit createSlice function to make a reducer function that knows how to handle our posts data. Reducer functions need to have some initial data included so that the Redux store has those values loaded when the app starts up.
现在,我们将创建一个数组,其中包含一些假的 post 对象,以便我们可以开始添加 UI。
¥For now, we'll create an array with some fake post objects inside so that we can begin adding the UI.
我们将导入 createSlice,定义初始 posts 数组,将其传递给 createSlice,然后导出 createSlice 为我们生成的 posts 缩减器函数:
¥We'll import createSlice, define our initial posts array, pass that to createSlice, and export the posts reducer function that createSlice generated for us:
import { createSlice } from '@reduxjs/toolkit'

// Define a TS type for the data we'll be using
export interface Post {
  id: string
  title: string
  content: string
}

// Create an initial state value for the reducer, with that type
const initialState: Post[] = [
  { id: '1', title: 'First Post!', content: 'Hello!' },
  { id: '2', title: 'Second Post', content: 'More text' }
]

// Create the slice and pass in the initial state
const postsSlice = createSlice({
  name: 'posts',
  initialState,
  reducers: {}
})

// Export the generated reducer function
export default postsSlice.reducer
每次创建新切片时,我们都需要将其 reducer 函数添加到 Redux 存储中。我们已经创建了一个 Redux 存储,但现在里面没有任何数据。打开 app/store.ts,导入 postsReducer 函数,删除所有 counter 代码,并更新对 configureStore 的调用,以便将 postsReducer 作为名为 posts 的 Reducer 字段传递:
¥Every time we create a new slice, we need to add its reducer function to our Redux store. We already have a Redux store being created, but right now it doesn't have any data inside. Open up app/store.ts, import the postsReducer function, remove all of the counter code, and update the call to configureStore so that the postsReducer is being passed as a reducer field named posts:
import { configureStore } from '@reduxjs/toolkit'

// Removed the `counterReducer` function, `CounterState` type, and `Action` import

import postsReducer from '@/features/posts/postsSlice'

export const store = configureStore({
  reducer: {
    posts: postsReducer
  }
})
这告诉 Redux,我们希望顶层状态对象内部有一个名为 posts 的字段,并且当调度操作时,state.posts 的所有数据将由 postsReducer 函数更新。
¥This tells Redux that we want our top-level state object to have a field named posts inside, and all the data for state.posts will be updated by the postsReducer function when actions are dispatched.
我们可以通过打开 Redux DevTools Extension 并查看当前状态内容来确认这是否有效:
¥We can confirm that this works by opening the Redux DevTools Extension and looking at the current state contents:

显示帖子列表
¥Showing the Posts List
现在我们的存储中有一些帖子数据,我们可以创建一个显示帖子列表的 React 组件。与我们的提要帖子功能相关的所有代码都应位于 posts 文件夹中,因此请继续在其中创建一个名为 PostsList.tsx 的新文件。(请注意,由于这是一个用 TypeScript 编写并使用 JSX 语法的 React 组件,因此需要 .tsx 文件扩展名才能让 TypeScript 对其进行编译正确)
¥Now that we have some posts data in our store, we can create a React component that shows the list of posts. All of the code related to our feed posts feature should go in the posts folder, so go ahead and create a new file named PostsList.tsx in there. (Note that since this is a React component written in TypeScript and using JSX syntax, it needs a .tsx file extension for TypeScript to compile it properly)
如果我们要渲染帖子列表,我们需要从某个地方获取数据。React 组件可以使用 React-Redux 库中的 useSelector 钩子从 Redux 存储中读取数据。你编写的 "选择器功能" 将以整个 Redux state 对象作为参数来调用,并且应该从存储中返回该组件需要的特定数据。
¥If we're going to render a list of posts, we need to get the data from somewhere. React components can read data from the Redux store using the useSelector hook from the React-Redux library. The "selector functions" that you write will be called with the entire Redux state object as a parameter, and should return the specific data that this component needs from the store.
由于我们使用 TypeScript,因此我们所有的组件都应该始终使用我们在 src/app/hooks.ts 中添加的预类型 useAppSelector 钩子,因为它已经包含了正确的 RootState 类型。
¥Since we're using TypeScript, all of our components should always use the pre-typed useAppSelector hook that we added in src/app/hooks.ts, since that has the right RootState type already included.
我们最初的 PostsList 组件将从 Redux 存储中读取 state.posts 值,然后循环遍历帖子数组并将每个帖子显示在屏幕上:
¥Our initial PostsList component will read the state.posts value from the Redux store, then loop over the array of posts and show each of them on screen:
import { useAppSelector } from '@/app/hooks'

export const PostsList = () => {
  // Select the `state.posts` value from the store into the component
  const posts = useAppSelector(state => state.posts)

  const renderedPosts = posts.map(post => (
    <article className="post-excerpt" key={post.id}>
      <h3>{post.title}</h3>
      <p className="post-content">{post.content.substring(0, 100)}</p>
    </article>
  ))

  return (
    <section className="posts-list">
      <h2>Posts</h2>
      {renderedPosts}
    </section>
  )
}
然后,我们需要更新 App.tsx 中的路由,以便显示 PostsList 组件而不是 "welcome" 消息。将 PostsList 组件导入到 App.tsx 中,并将欢迎文本替换为 <PostsList />。我们还将把它封装在 React 片段 中,因为我们很快就会向主页添加其他内容:
¥We then need to update the routing in App.tsx so that we show the PostsList component instead of the "welcome" message. Import the PostsList component into App.tsx, and replace the welcome text with <PostsList />. We'll also wrap it in a React Fragment, because we're going to add something else to the main page soon:
import { BrowserRouter as Router, Route, Routes } from 'react-router-dom'

import { Navbar } from './components/Navbar'
import { PostsList } from './features/posts/PostsList'

function App() {
  return (
    <Router>
      <Navbar />
      <div className="App">
        <Routes>
          <Route
            path="/"
            element={
              <>
                <PostsList />
              </>
            }
          ></Route>
        </Routes>
      </div>
    </Router>
  )
}

export default App
添加后,我们应用的主页现在应如下所示:
¥Once that's added, the main page of our app should now look like this:
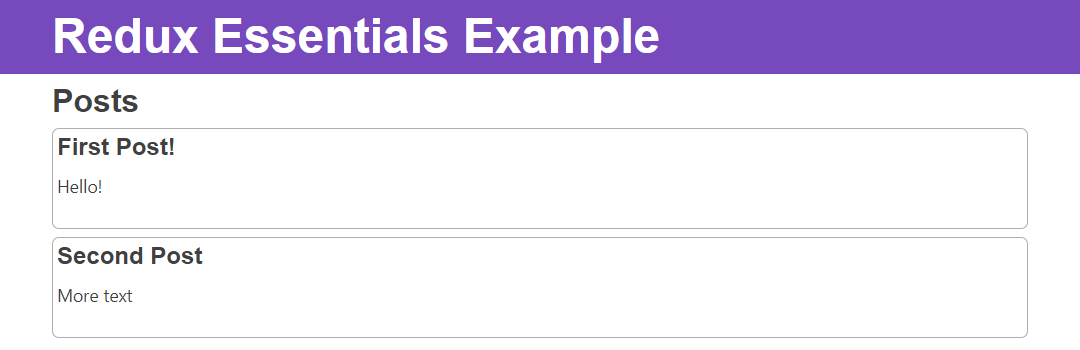
进步!我们已向 Redux 存储添加了一些数据,并将其显示在 React 组件的屏幕上。
¥Progress! We've added some data to the Redux store, and shown it on screen in a React component.
添加新帖子
¥Adding New Posts
很高兴看到人们写的帖子,但我们希望能够写我们自己的帖子。让我们创建一个 "添加新帖子" 表单,让我们可以编写帖子并保存它们。
¥It's nice to look at posts people have written, but we'd like to be able to write our own posts. Let's create an "Add New Post" form that lets us write posts and save them.
我们将首先创建空表单并将其添加到页面。然后,我们将表单连接到 Redux 存储,以便在单击 "保存帖子" 按钮时添加新帖子。
¥We'll create the empty form first and add it to the page. Then, we'll connect the form to our Redux store so that new posts are added when we click the "Save Post" button.
添加新的帖子表单
¥Adding the New Post Form
在 posts 文件夹中创建 AddPostForm.tsx。我们将为帖子标题添加文本输入,并为帖子正文添加文本区域:
¥Create AddPostForm.tsx in our posts folder. We'll add a text input for the post title, and a text area for the body of the post:
import React from 'react'

// TS types for the input fields
// See: https://epicreact.dev/how-to-type-a-react-form-on-submit-handler/
interface AddPostFormFields extends HTMLFormControlsCollection {
  postTitle: HTMLInputElement
  postContent: HTMLTextAreaElement
}
interface AddPostFormElements extends HTMLFormElement {
  readonly elements: AddPostFormFields
}

export const AddPostForm = () => {
  const handleSubmit = (e: React.FormEvent<AddPostFormElements>) => {
    // Prevent server submission
    e.preventDefault()

    const { elements } = e.currentTarget
    const title = elements.postTitle.value
    const content = elements.postContent.value

    console.log('Values: ', { title, content })

    e.currentTarget.reset()
  }

  return (
    <section>
      <h2>Add a New Post</h2>
      <form onSubmit={handleSubmit}>
        <label htmlFor="postTitle">Post Title:</label>
        <input type="text" id="postTitle" defaultValue="" required />
        <label htmlFor="postContent">Content:</label>
        <textarea
          id="postContent"
          name="postContent"
          defaultValue=""
          required
        />
        <button>Save Post</button>
      </form>
    </section>
  )
}
请注意,这还没有任何 Redux 特定的逻辑 - 我们接下来会添加。
¥Note that this doesn't have any Redux-specific logic yet - we'll add that next.
在此示例中,我们使用 "uncontrolled" 输入 并使用 HTML5 表单验证来防止提交空输入字段,但如何从表单中读取值取决于你 - 这是关于 React 使用模式的偏好,并不特定于 Redux。
¥In this example we're using "uncontrolled" inputs and using HTML5 form validation to prevent submitting empty input fields, but it's up to you how you read values from a form - that's a preference about React usage patterns and not specific to Redux.
将该组件导入到 App.tsx 中,并将其添加到 <PostsList /> 组件的正上方:
¥Import that component into App.tsx, and add it right above the <PostsList /> component:
// omit outer `<App>` definition
<Route
  path="/"
  element={
    <>
      <AddPostForm />
      <PostsList />
    </>
  }
></Route>
你应该会看到该表单显示在页眉正下方的页面中。
¥You should see the form show up in the page right below the header.
保存帖子条目
¥Saving Post Entries
现在,让我们更新 posts 切片以将新的帖子条目添加到 Redux 存储中。
¥Now, let's update our posts slice to add new post entries to the Redux store.
我们的帖子切片负责处理帖子数据的所有更新。在 createSlice 调用内部,有一个名为 reducers 的对象。现在,它是空的。我们需要在其中添加一个 reducer 函数来处理添加帖子的情况。
¥Our posts slice is responsible for handling all updates to the posts data. Inside of the createSlice call, there's an object called reducers. Right now, it's empty. We need to add a reducer function inside of there to handle the case of a post being added.
在 reducers 内部,添加一个名为 postAdded 的函数,它将接收两个参数:当前 state 值和已分派的 action 对象。由于 posts 切片只知道它负责的数据,因此 state 参数将是帖子数组本身,而不是整个 Redux 状态对象。
¥Inside of reducers, add a function named postAdded, which will receive two arguments: the current state value, and the action object that was dispatched. Since the posts slice only knows about the data it's responsible for, the state argument will be the array of posts by itself, and not the entire Redux state object.
action 对象将把我们的新帖子条目作为 action.payload 字段。当我们声明 Reducer 函数时,我们还需要告诉 TypeScript 实际的 action.payload 类型是什么,以便它可以正确检查我们何时传入参数并访问 action.payload 内容。为此,我们需要从 Redux Toolkit 导入 PayloadAction 类型,并将 action 参数声明为 action: PayloadAction<ThePayloadTypeHere>。在这种情况下,那将是 action: PayloadAction<Post>。
¥The action object will have our new post entry as the action.payload field. When we declare the reducer function, we also need to tell TypeScript what that actual action.payload type is, so that it can correctly check when we pass in the argument and access the action.payload contents. To do that, we need to import the PayloadAction type from Redux Toolkit, and declare the action argument as action: PayloadAction<ThePayloadTypeHere>. In this case, that will be action: PayloadAction<Post>.
实际状态更新是将新的帖子对象添加到 state 数组中,我们可以通过 Reducer 中的 state.push() 来完成。
¥The actual state update is adding the new post object into the state array, which we can do via state.push() in the reducer.
记住:Redux Reducer 函数必须始终通过复制来不可变地创建新的状态值!由于 它使用 Immer 库在内部将这些突变转换为安全的不可变更新,在 createSlice() 内部调用修改函数(如 Array.push())或修改对象字段(如 state.someField = someValue)是安全的,但不要尝试修改 createSlice 之外的任何数据!
¥Remember: Redux reducer functions must always create new state values immutably, by making copies! It's safe to call mutating functions like Array.push() or modify object fields like state.someField = someValue inside of createSlice(), because it converts those mutations into safe immutable updates internally using the Immer library, but don't try to mutate any data outside of createSlice!
当我们编写 postAdded reducer 函数时,createSlice 将自动生成一个同名的 "动作创造者" 功能。我们可以导出该操作创建者并在 UI 组件中使用它,以便在用户单击 "保存帖子" 时调度该操作。
¥When we write the postAdded reducer function, createSlice will automatically generate an "action creator" function with the same name. We can export that action creator and use it in our UI components to dispatch the action when the user clicks "Save Post".
// Import the `PayloadAction` TS type
import { createSlice, PayloadAction } from '@reduxjs/toolkit'

// omit initial state

const postsSlice = createSlice({
  name: 'posts',
  initialState,
  reducers: {
    // Declare a "case reducer" named `postAdded`.
    // The type of `action.payload` will be a `Post` object.
    postAdded(state, action: PayloadAction<Post>) {
      // "Mutate" the existing state array, which is
      // safe to do here because `createSlice` uses Immer inside.
      state.push(action.payload)
    }
  }
})

// Export the auto-generated action creator with the same name
export const { postAdded } = postsSlice.actions

export default postsSlice.reducer
从术语上讲,这里的 postAdded 是 "案例 reducer" 的一个例子。它是一个切片内的 Reducer 函数,用于处理已分派的一种特定操作类型。从概念上讲,这就像我们在 switch 中编写了一个 case 语句 - "当我们看到此确切操作类型时,运行此逻辑":
¥Terminology-wise, postAdded here is an example of a "case reducer". It's a reducer function, inside of a slice, that handles one specific action type that was dispatched. Conceptually, it's like we wrote a case statement inside of a switch - "when we see this exact action type, run this logic":
function sliceReducer(state = initialState, action) {
  switch (action.type) {
    case 'posts/postAdded': {
      // update logic here
    }
  }
}
调度 "帖子已添加" 行动
¥Dispatching the "Post Added" Action
我们的 AddPostForm 有文本输入和一个触发提交处理程序的 "保存帖子" 按钮,但该按钮尚未执行任何操作。我们需要更新提交处理程序以分派 postAdded 操作创建者并传入一个包含用户编写的标题和内容的新帖子对象。
¥Our AddPostForm has text inputs and a "Save Post" button that triggers a submit handler, but the button doesn't do anything yet. We need to update the submit handler to dispatch the postAdded action creator and pass in a new post object containing the title and content the user wrote.
我们的帖子对象还需要有一个 id 字段。目前,我们最初的测试帖子使用了一些假号码作为他们的 ID。我们可以编写一些代码来计算出下一个递增的 ID 号应该是什么,但如果我们生成一个随机的唯一 ID 会更好。Redux Toolkit 有一个 nanoid 函数,我们可以使用它。
¥Our post objects also need to have an id field. Right now, our initial test posts are using some fake numbers for their IDs. We could write some code that would figure out what the next incrementing ID number should be, but it would be better if we generated a random unique ID instead. Redux Toolkit has a nanoid function we can use for that.
我们将在 第 4 部分:使用 Redux 数据 中详细讨论生成 ID 和分派操作。
¥We'll talk more about generating IDs and dispatching actions in Part 4: Using Redux Data.
为了从组件分派操作,我们需要访问存储的 dispatch 函数。我们通过从 React-Redux 调用 useDispatch 钩子来获得这一点。由于我们使用 TypeScript,这意味着我们实际上应该导入具有正确类型的 useAppDispatch 钩子。我们还需要将 postAdded 动作创建器导入到该文件中。
¥In order to dispatch actions from a component, we need access to the store's dispatch function. We get this by calling the useDispatch hook from React-Redux. Since we're using TypeScript, that means that we should actually import the useAppDispatch hook with the right types. We also need to import the postAdded action creator into this file.
一旦我们的组件中提供了 dispatch 函数,我们就可以在点击处理程序中调用 dispatch(postAdded())。我们可以从表单中获取标题和内容值,生成一个新的 ID,并将它们放在一起,形成一个传递给 postAdded() 的新帖子对象。
¥Once we have the dispatch function available in our component, we can call dispatch(postAdded()) in a click handler. We can take the title and content values from our form, generate a new ID, and put them together into a new post object that we pass to postAdded().
import React from 'react'
import { nanoid } from '@reduxjs/toolkit'

import { useAppDispatch } from '@/app/hooks'

import { type Post, postAdded } from './postsSlice'

// omit form types

export const AddPostForm = () => {
  // Get the `dispatch` method from the store
  const dispatch = useAppDispatch()


  const handleSubmit = (e: React.FormEvent<AddPostFormElements>) => {
    // Prevent server submission
    e.preventDefault()

    const { elements } = e.currentTarget
    const title = elements.postTitle.value
    const content = elements.postContent.value

    // Create the post object and dispatch the `postAdded` action
    const newPost: Post = {
      id: nanoid(),
      title,
      content
    }
    dispatch(postAdded(newPost))

    e.currentTarget.reset()
  }

  return (
    <section>
      <h2>Add a New Post</h2>
      <form onSubmit={handleSubmit}>
        <label htmlFor="postTitle">Post Title:</label>
        <input type="text" id="postTitle" defaultValue="" required />
        <label htmlFor="postContent">Content:</label>
        <textarea
          id="postContent"
          name="postContent"
          defaultValue=""
          required
        />
        <button>Save Post</button>
      </form>
    </section>
  )
}
现在,尝试输入标题和一些文本,然后单击 "保存帖子"。你应该会在帖子列表中看到该帖子的新项目。
¥Now, try typing in a title and some text, and click "Save Post". You should see a new item for that post show up in the posts list.
恭喜!你刚刚构建了第一个可用的 React + Redux 应用!
¥Congratulations! You've just built your first working React + Redux app!
这显示了完整的 Redux 数据流周期:
¥This shows the complete Redux data flow cycle:
-
我们的帖子列表使用
useSelector从存储读取初始帖子集并渲染初始 UI¥Our posts list read the initial set of posts from the store with
useSelectorand rendered the initial UI -
我们发送了包含新帖子条目数据的
postAdded操作¥We dispatched the
postAddedaction containing the data for the new post entry -
posts 缩减程序看到了
postAdded操作,并使用新条目更新了 posts 数组¥The posts reducer saw the
postAddedaction, and updated the posts array with the new entry -
Redux 存储告诉 UI 某些数据已更改
¥The Redux store told the UI that some data had changed
-
帖子列表读取更新的帖子数组,并重新渲染自身以显示新帖子
¥The posts list read the updated posts array, and re-rendered itself to show the new post
我们在此之后添加的所有新功能都将遵循你在此处看到的相同基本模式:添加状态切片、编写 reducer 函数、分派操作以及根据 Redux 存储中的数据渲染 UI。
¥All the new features we'll add after this will follow the same basic patterns you've seen here: adding slices of state, writing reducer functions, dispatching actions, and rendering the UI based on data from the Redux store.
我们可以检查 Redux DevTools 扩展来查看我们调度的操作,并查看 Redux 状态如何响应该操作而更新。如果我们单击操作列表中的 "posts/postAdded" 条目,"行动" 选项卡应如下所示:
¥We can check the Redux DevTools Extension to see the action we dispatched, and look at how the Redux state was updated in response to that action. If we click the "posts/postAdded" entry in the actions list, the "Action" tab should look like this:

"差异" 选项卡还应该向我们显示 state.posts 添加了一项新项目,该项目位于索引 2 处。
¥The "Diff" tab should also show us that state.posts had one new item added, which is at index 2.
请记住,Redux 存储应该只包含应用被视为 "global" 的数据!在这种情况下,只有 AddPostForm 需要知道输入字段的最新值。即使我们用 "controlled" 输入 构建表单,我们也希望将数据保存在 React 组件状态中,而不是尝试将临时数据保存在 Redux 存储中。当用户完成表单后,我们调度一个 Redux 操作,根据用户输入使用最终值更新存储。
¥Remember, the Redux store should only contain data that's considered "global" for the application! In this case, only the AddPostForm will need to know about the latest values for the input fields. Even if we built the form with "controlled" inputs, we'd want to keep the data in React component state instead of trying to keep the temporary data in the Redux store. When the user is done with the form, we dispatch a Redux action to update the store with the final values based on the user input.
你学到了什么
¥What You've Learned
我们已经设置了 Redux 应用的基础知识 - 存储、使用 Reducer 切片和 UI 来分派操作。到目前为止,该应用的外观如下:
¥We've set up the basics of a Redux app - store, slice with reducers, and UI to dispatch actions. Here's what the app looks like so far:
让我们回顾一下你在本节中学到的内容:
¥Let's recap what you've learned in this section:
-
Redux 应用有一个
store,它通过<Provider>组件传递给 React 组件¥A Redux app has a single
storethat is passed to React components via a<Provider>component -
Redux 状态由 "reducer 函数" 更新:
¥Redux state is updated by "reducer functions":
-
reducer 总是通过复制现有状态值并使用新数据修改副本来不可变地计算新状态
¥Reducers always calculate a new state immutably, by copying existing state values and modifying the copies with the new data
-
Redux Toolkit
createSlice函数为你生成 "切片 reducer" 函数,并让你编写 "mutating" 代码,这些代码将转换为安全的不可变更新¥The Redux Toolkit
createSlicefunction generates "slice reducer" functions for you, and lets you write "mutating" code that is turned into safe immutable updates -
这些切片缩减器函数被添加到
configureStore中的reducer字段,并定义 Redux 存储内的数据和状态字段名称¥Those slice reducer functions are added to the
reducerfield inconfigureStore, and that defines the data and state field names inside the Redux store
-
-
React 组件使用
useSelector钩子从存储中读取数据¥React components read data from the store with the
useSelectorhook-
选择器函数接收整个
state对象,并且应该返回一个值¥Selector functions receive the whole
stateobject, and should return a value -
每当 Redux 存储更新时,选择器都会重新运行,如果它们返回的数据发生更改,组件将重新渲染
¥Selectors will re-run whenever the Redux store is updated, and if the data they return has changed, the component will re-render
-
-
React 组件使用
useDispatch钩子调度动作来更新存储¥React components dispatch actions to update the store using the
useDispatchhook-
createSlice将为我们添加到切片的每个 reducer 生成动作创建器函数¥
createSlicewill generate action creator functions for each reducer we add to a slice -
在组件中调用
dispatch(someActionCreator())来调度操作¥Call
dispatch(someActionCreator())in a component to dispatch an action -
reducer 将运行,检查此操作是否相关,并在适当的情况下返回新状态
¥Reducers will run, check to see if this action is relevant, and return new state if appropriate
-
临时数据(如表单输入值)应保留为 React 组件状态或纯 HTML 输入字段。当用户完成表单操作后,调度 Redux 操作来更新存储。
¥Temporary data like form input values should be kept as React component state or plain HTML input fields. Dispatch a Redux action to update the store when the user is done with the form.
-
-
如果你使用的是 TypeScript,初始应用设置应根据存储为
RootState和AppDispatch定义 TS 类型,并导出 React-ReduxuseSelector和useDispatch钩子的预类型版本¥If you're using TypeScript, the initial app setup should define TS types for
RootStateandAppDispatchbased on the store, and export pre-typed versions of the React-ReduxuseSelectoranduseDispatchhooks
下一步是什么?
¥What's Next?
现在你已经了解了基本的 Redux 数据流,请继续学习 第 4 部分:使用 Redux 数据,我们将在其中向我们的应用添加一些附加功能,并查看如何使用存储中已有数据的示例。
¥Now that you know the basic Redux data flow, move on to Part 4: Using Redux Data, where we'll add some additional functionality to our app and see examples of how to work with the data that's already in the store.