Redux 要点,第 2 部分:Redux 工具包应用结构
-
典型的 React + Redux Toolkit 应用的结构
¥The structure of a typical React + Redux Toolkit app
-
如何在 Redux DevTools 扩展中查看状态更改
¥How to view state changes in the Redux DevTools Extension
介绍
¥Introduction
在 第 1 部分:Redux 概述和概念 中,我们研究了 Redux 为何有用、用于描述 Redux 代码不同部分的术语和概念,以及数据如何流经 Redux 应用。
¥In Part 1: Redux Overview and Concepts, we looked at why Redux is useful, the terms and concepts used to describe different parts of Redux code, and how data flows through a Redux app.
现在,让我们看一个真实的工作示例,看看这些部分如何组合在一起。
¥Now, let's look at a real working example to see how these pieces fit together.
计数器示例应用
¥The Counter Example App
我们将看到的示例项目是一个小型计数器应用,它允许我们在单击按钮时对数字进行加法或减法。它可能不是很令人兴奋,但它展示了 React+Redux 应用的所有重要部分。
¥The sample project we'll look at is a small counter application that lets us add or subtract from a number as we click buttons. It may not be very exciting, but it shows all the important pieces of a React+Redux application in action.
该项目是使用较小版本的 Vite 的官方 Redux Toolkit 模板 创建的。开箱即用,它已经配置了标准的 Redux 应用结构,使用 Redux 工具包 创建 Redux 存储和逻辑,并使用 React-Redux 将 Redux 存储和 React 组件连接在一起。
¥The project has been created using a smaller version of the official Redux Toolkit template for Vite. Out of the box, it has already been configured with a standard Redux application structure, using Redux Toolkit to create the Redux store and logic, and React-Redux to connect together the Redux store and the React components.
这是该项目的实时版本。你可以通过单击右侧应用预览中的按钮来试用它,然后浏览左侧的源文件。
¥Here's the live version of the project. You can play around with it by clicking the buttons in the app preview on the right, and browse through the source files on the left.
如果你想在自己的计算机上设置此项目,可以使用以下命令创建本地副本:
¥If you'd like to set up this project on your own computer, you can create a local copy with this command:
npx degit reduxjs/redux-templates/packages/rtk-app-structure-example my-app
你还可以使用 Vite 的完整 Redux Toolkit 模板创建一个新项目:
¥You can also create a new project using the full Redux Toolkit template for Vite:
npx degit reduxjs/redux-templates/packages/vite-template-redux my-app
使用计数器应用
¥Using the Counter App
计数器应用已经设置好,让我们可以在使用时观察内部发生的情况。
¥The counter app has already been set up to let us watch what happens inside as we use it.
打开浏览器的开发工具。然后,选择 DevTools 中的 "Redux" 选项卡,然后单击右上角工具栏中的 "状态" 按钮。你应该看到如下所示的内容:
¥Open up your browser's DevTools. Then, choose the "Redux" tab in the DevTools, and click the "State" button in the upper-right toolbar. You should see something that looks like this:
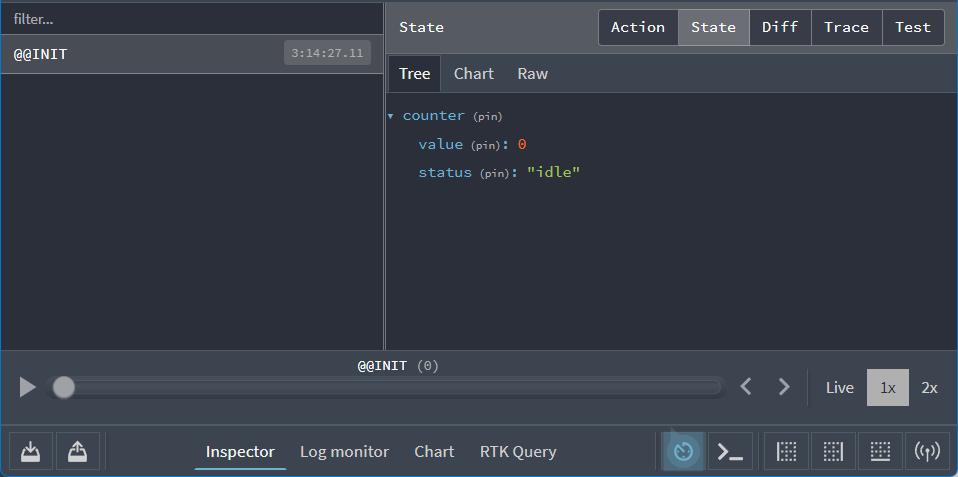
在右侧,我们可以看到我们的 Redux 存储从一个如下所示的应用状态值开始:
¥On the right, we can see that our Redux store is starting off with an app state value that looks like this:
{
  counter: {
    value: 0
    status: 'idle'
  }
}
DevTools 将向我们展示当我们使用应用时存储状态如何变化。
¥The DevTools will show us how the store state changes as we use the app.
让我们先试用一下该应用,看看它能做什么。单击应用中的 "*" 按钮,然后查看 Redux DevTools 中的 "差异" 选项卡:
¥Let's play with the app first to see what it does. Click the "+" button in the app, then look at the "Diff" tab in the Redux DevTools:
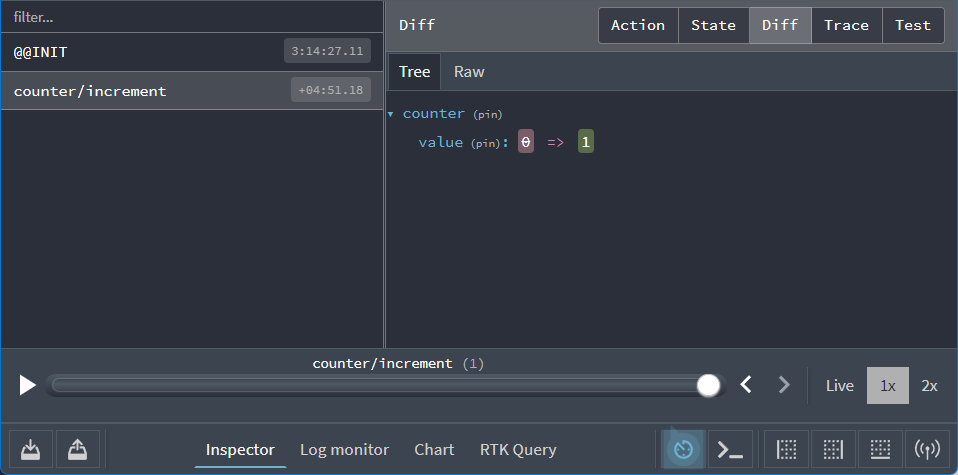
在这里我们可以看到两件重要的事情:
¥We can see two important things here:
-
当我们单击 "*" 按钮时,类型为
"counter/increment"的操作被分派到存储¥When we clicked the "+" button, an action with a type of
"counter/increment"was dispatched to the store -
调度该操作后,
state.counter.value字段从0更改为1¥When that action was dispatched, the
state.counter.valuefield changed from0to1
现在尝试以下步骤:
¥Now try these steps:
-
再次单击 "*" 按钮。现在显示的值应该是 2。
¥Click the "+" button again. The displayed value should now be 2.
-
单击 "*" 按钮一次。现在显示的值应该是 1。
¥Click the "-" button once. The displayed value should now be 1.
-
单击 "添加金额" 按钮。现在显示的值应该是 3。
¥Click the "Add Amount" button. The displayed value should now be 3.
-
将文本框中的数字 "2" 更改为 "3"
¥Change the number "2" in the textbox to a "3"
-
单击 "添加异步" 按钮。你应该会看到按钮充满了进度条,几秒钟后,显示的值应更改为 6。
¥Click the "Add Async" button. You should see a progress bar fill the button, and after a couple seconds, the displayed value should change to 6.
返回 Redux DevTools。你应该看到总共调度了五个操作,每次单击一个按钮就执行一个操作。 现在从左侧列表中选择最后一个 "counter/incrementByAmount" 条目,然后单击右侧的 "行动" 选项卡:
¥Go back to the Redux DevTools. You should see a total of five actions dispatched, one for each time we clicked a button . Now select the last "counter/incrementByAmount" entry from the list on the left, and click the "Action" tab on the right side:
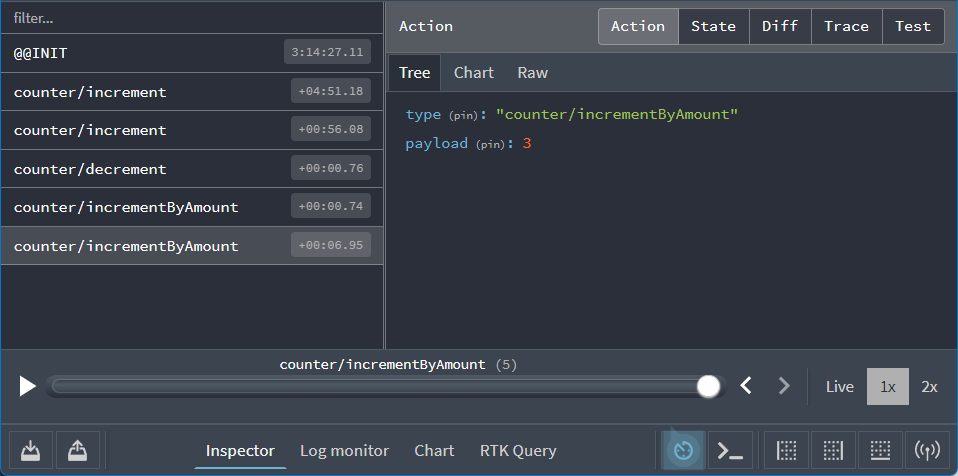
我们可以看到这个动作对象看起来像这样:
¥We can see that this action object looked like this:
{
  type: 'counter/incrementByAmount',
  payload: 3
}
如果单击 "差异" 选项卡,你可以看到 state.counter.value 字段响应该操作从 3 更改为 6。
¥And if you click the "Diff" tab, you can see that the state.counter.value field changed from a 3 to a 6 in response to that action.
查看应用内部发生的情况以及我们的状态如何随时间变化的能力非常强大!
¥The ability to see what is happening inside of our app and how our state is changing over time is very powerful!
DevTools 还有更多命令和选项来帮助你调试应用。尝试单击右上角的 "痕迹" 选项卡。你应该在面板中看到 JavaScript 函数堆栈跟踪,其中源代码的几个部分显示了操作到达存储时正在执行的行。应特别强调一行:我们从 <Counter> 组件分派此操作的代码行:
¥The DevTools have several more commands and options to help you debug your app. Try clicking the "Trace" tab in the upper right. You should see a JavaScript function stack trace in the panel, with several sections of source code showing the lines that were executing when the action reached the store. One line in particular should be highlighted: the line of code where we dispatched this action from the <Counter> component:
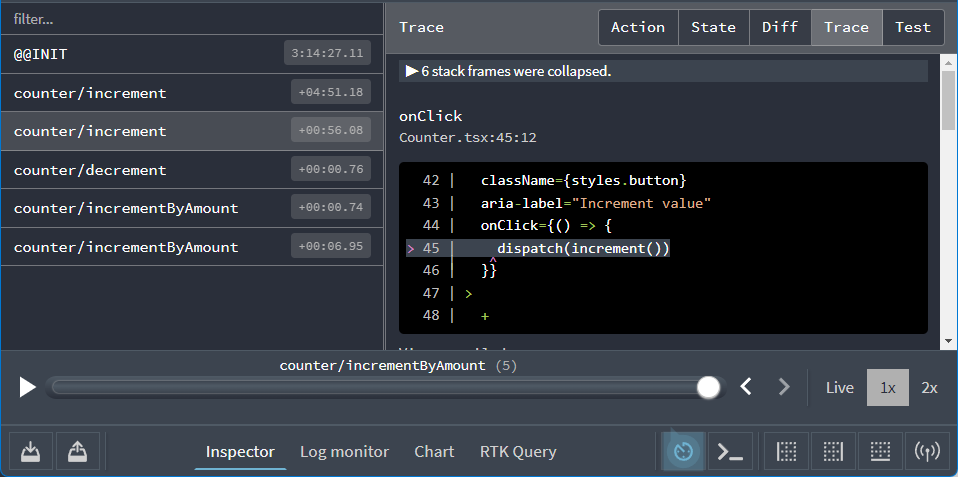
这样可以更轻松地跟踪代码的哪一部分调度了特定操作。
¥This makes it easier to trace what part of the code dispatched a specific action.
应用内容
¥Application Contents
现在你已经知道该应用的用途了,让我们看看它是如何工作的。
¥Now that you know what the app does, let's look at how it works.
以下是构成该应用的关键文件:
¥Here are the key files that make up this application:
-
/src-
main.tsx:应用的起点¥
main.tsx: the starting point for the app -
App.tsx:顶层 React 组件¥
App.tsx: the top-level React component -
/app-
store.ts:创建 Redux 存储实例¥
store.ts: creates the Redux store instance -
hooks.ts:导出预先输入的 React-Redux 钩子¥
hooks.ts: exports pre-typed React-Redux hooks
-
-
/features-
/counter-
Counter.tsx:显示计数器功能 UI 的 React 组件¥
Counter.tsx: a React component that shows the UI for the counter feature -
counterSlice.ts:计数器功能的 Redux 逻辑¥
counterSlice.ts: the Redux logic for the counter feature
-
-
-
让我们首先看看 Redux store 是如何创建的。
¥Let's start by looking at how the Redux store is created.
创建 Redux 存储
¥Creating the Redux Store
打开 app/store.ts,它应该如下所示:
¥Open up app/store.ts, which should look like this:
import type { Action, ThunkAction } from '@reduxjs/toolkit'
import { configureStore } from '@reduxjs/toolkit'
import counterReducer from '@/features/counter/counterSlice'

export const store = configureStore({
  reducer: {
    counter: counterReducer
  }
})

// Infer the type of `store`
export type AppStore = typeof store
export type RootState = ReturnType<AppStore['getState']>
// Infer the `AppDispatch` type from the store itself
export type AppDispatch = AppStore['dispatch']
// Define a reusable type describing thunk functions
export type AppThunk<ThunkReturnType = void> = ThunkAction<
  ThunkReturnType,
  RootState,
  unknown,
  Action
>
Redux 存储是使用 Redux Toolkit 中的 configureStore 函数创建的。configureStore 要求我们传入 reducer 参数。
¥The Redux store is created using the configureStore function from Redux Toolkit. configureStore requires that we pass in a reducer argument.
我们的应用可能由许多不同的功能组成,每个功能都可能有自己的 reducer 功能。当我们调用 configureStore 时,我们可以传入一个对象中所有不同的 reducer。对象中的键名称将定义最终状态值中的键。
¥Our application might be made up of many different features, and each of those features might have its own reducer function. When we call configureStore, we can pass in all of the different reducers in an object. The key names in the object will define the keys in our final state value.
我们有一个名为 features/counter/counterSlice.ts 的文件,它将计数器逻辑的 Reducer 函数导出为 ESM "default" 导出。我们可以将该函数导入到这个文件中。由于它是默认导出,因此当我们将其导入此文件时,我们可以为该变量赋予任何我们想要的名称。在这种情况下,我们在这里将其称为 counterReducer,并在创建存储时将其包括在内。(请注意 此处的导入/导出行为是标准 ES 模块语法,而不是特定于 Redux。)
¥We have a file named features/counter/counterSlice.ts that exports a reducer function for the counter logic as the ESM "default" export. We can import that function into this file. Since it's a default export, we can give that variable any name we want when we import it into this file. In this case, we call it counterReducer here, and include it when we create the store. (Note that the import/export behavior here is standard ES Module syntax, and not specific to Redux.)
当我们传入像 {counter: counterReducer} 这样的对象时,这表明我们希望 Redux 状态对象有一个 state.counter 部分,并且我们希望 counterReducer 函数负责决定是否以及如何在调度操作时更新 state.counter 部分。
¥When we pass in an object like {counter: counterReducer}, that says that we want to have a state.counter section of our Redux state object, and that we want the counterReducer function to be in charge of deciding if and how to update the state.counter section whenever an action is dispatched.
Redux 允许使用不同类型的插件("中间件" 和 "enhancers")自定义存储设置。默认情况下,configureStore 会自动将多个中间件添加到存储设置中,以提供良好的开发者体验,并且还设置存储以便 Redux DevTools Extension 可以检查其内容。
¥Redux allows store setup to be customized with different kinds of plugins ("middleware" and "enhancers"). configureStore automatically adds several middleware to the store setup by default to provide a good developer experience, and also sets up the store so that the Redux DevTools Extension can inspect its contents.
对于 TypeScript 使用,我们还希望基于 Store 导出一些可重用的类型,例如 RootState 和 AppDispatch 类型。我们将在稍后看到它们的用法。
¥For TypeScript usage, we also want to export some reusable types based on the Store, such as the RootState and AppDispatch types. We'll see how those get used later.
Redux 切片
¥Redux Slices
"slice" 是应用中单个功能的 Redux reducer 逻辑和操作的集合,通常在单个文件中一起定义。这个名字来源于将根 Redux 状态对象分割成多个 "切片" 状态。
¥A "slice" is a collection of Redux reducer logic and actions for a single feature in your app, typically defined together in a single file. The name comes from splitting up the root Redux state object into multiple "slices" of state.
例如,在博客应用中,我们的存储设置可能如下所示:
¥For example, in a blogging app, our store setup might look like:
import { configureStore } from '@reduxjs/toolkit'
import usersReducer from '../features/users/usersSlice'
import postsReducer from '../features/posts/postsSlice'
import commentsReducer from '../features/comments/commentsSlice'

export const store = configureStore({
  reducer: {
    users: usersReducer,
    posts: postsReducer,
    comments: commentsReducer
  }
})
在该示例中,state.users、state.posts 和 state.comments 各自是 Redux 状态的单独 "slice"。由于 usersReducer 负责更新 state.users 切片,因此我们将其称为 "切片 reducer" 函数。
¥In that example, state.users, state.posts, and state.comments are each a separate "slice" of the Redux state. Since usersReducer is responsible for updating the state.users slice, we refer to it as a "slice reducer" function.
Detailed Explanation: Reducers and State Structure
Redux 存储在创建时需要传入一个 "根 reducer" 函数。因此,如果我们有许多不同的切片 reducer 函数,我们如何获得单个根 reducer,以及它如何定义 Redux 存储状态的内容?
¥A Redux store needs to have a single "root reducer" function passed in when it's created. So if we have many different slice reducer functions, how do we get a single root reducer instead, and how does this define the contents of the Redux store state?
如果我们尝试手动调用所有切片 reducer,它可能如下所示:
¥If we tried calling all of the slice reducers by hand, it might look like this:
function rootReducer(state = {}, action) {
  return {
    users: usersReducer(state.users, action),
    posts: postsReducer(state.posts, action),
    comments: commentsReducer(state.comments, action)
  }
}
它单独调用每个切片缩减器,传入 Redux 状态的特定切片,并将每个返回值包含在最终的新 Redux 状态对象中。
¥That calls each slice reducer individually, passes in the specific slice of the Redux state, and includes each return value in the final new Redux state object.
Redux 有一个名为 combineReducers 的函数,可以自动为我们完成此操作。它接受一个充满切片 reducer 的对象作为其参数,并返回一个函数,该函数在调度操作时调用每个切片 reducer。每个切片 reducer 的结果都组合在一起形成一个对象作为最终结果。我们可以使用 combineReducers 执行与前面示例相同的操作:
¥Redux has a function called combineReducers that does this for us automatically. It accepts an object full of slice reducers as its argument, and returns a function that calls each slice reducer whenever an action is dispatched. The result from each slice reducer are all combined together into a single object as the final result. We can do the same thing as the previous example using combineReducers:
const rootReducer = combineReducers({
  users: usersReducer,
  posts: postsReducer,
  comments: commentsReducer
})
当我们将切片 reducer 的对象传递给 configureStore 时,它会将这些对象传递给 combineReducers 以便我们生成根 reducer。
¥When we pass an object of slice reducers to configureStore, it passes those to combineReducers for us to generate the root reducer.
正如我们之前看到的,你还可以直接传递一个 reducer 函数作为 reducer 参数:
¥As we saw earlier, you can also pass a reducer function directly as the reducer argument:
const store = configureStore({
  reducer: rootReducer
})
创建切片缩减器和操作
¥Creating Slice Reducers and Actions
既然我们知道 counterReducer 函数来自 features/counter/counterSlice.ts,那么让我们逐个查看该文件中的内容。
¥Since we know that the counterReducer function is coming from features/counter/counterSlice.ts, let's see what's in that file, piece by piece.
import { createAsyncThunk, createSlice } from '@reduxjs/toolkit'
import type { PayloadAction } from '@reduxjs/toolkit'

// Define the TS type for the counter slice's state
export interface CounterState {
  value: number
  status: 'idle' | 'loading' | 'failed'
}

// Define the initial value for the slice state
const initialState: CounterState = {
  value: 0,
  status: 'idle'
}

// Slices contain Redux reducer logic for updating state, and
// generate actions that can be dispatched to trigger those updates.
export const counterSlice = createSlice({
  name: 'counter',
  initialState,
  // The `reducers` field lets us define reducers and generate associated actions
  reducers: {
    increment: state => {
      // Redux Toolkit allows us to write "mutating" logic in reducers. It
      // doesn't actually mutate the state because it uses the Immer library,
      // which detects changes to a "draft state" and produces a brand new
      // immutable state based off those changes
      state.value += 1
    },
    decrement: state => {
      state.value -= 1
    },
    // Use the PayloadAction type to declare the contents of `action.payload`
    incrementByAmount: (state, action: PayloadAction<number>) => {
      state.value += action.payload
    }
  }
})

// Export the generated action creators for use in components
export const { increment, decrement, incrementByAmount } = counterSlice.actions

// Export the slice reducer for use in the store configuration
export default counterSlice.reducer
之前,我们看到单击 UI 中的不同按钮会调度三种不同的 Redux 操作类型:
¥Earlier, we saw that clicking the different buttons in the UI dispatched three different Redux action types:
-
{type: "counter/increment"} -
{type: "counter/decrement"} -
{type: "counter/incrementByAmount"}
我们知道操作是带有 type 字段的普通对象,type 字段始终是一个字符串,并且我们通常有 "动作创造者" 函数来创建和返回操作对象。那么这些动作对象、类型字符串和动作创建者是在哪里定义的呢?
¥We know that actions are plain objects with a type field, the type field is always a string, and we typically have "action creator" functions that create and return the action objects. So where are those action objects, type strings, and action creators defined?
我们每次都可以手写这些内容。但是,那会很乏味。此外,Redux 中真正重要的是 reducer 函数,以及它们计算新状态的逻辑。
¥We could write those all by hand, every time. But, that would be tedious. Besides, what's really important in Redux is the reducer functions, and the logic they have for calculating new state.
Redux Toolkit 有一个名为 createSlice 的函数,它负责生成动作类型字符串、动作创建器函数和动作对象的工作。你所要做的就是为这个切片定义一个名称,编写一个包含一些 reducer 函数的对象,它会自动生成相应的操作代码。name 选项中的字符串用作每个操作类型的第一部分,每个 reducer 函数的键名称用作第二部分。因此,"counter" 名称+"increment" reducer 函数生成了 {type: "counter/increment"} 的动作类型。(毕竟,如果计算机可以为我们做的话,为什么要用手写呢!)
¥Redux Toolkit has a function called createSlice, which takes care of the work of generating action type strings, action creator functions, and action objects. All you have to do is define a name for this slice, write an object that has some reducer functions in it, and it generates the corresponding action code automatically. The string from the name option is used as the first part of each action type, and the key name of each reducer function is used as the second part. So, the "counter" name + the "increment" reducer function generated an action type of {type: "counter/increment"}. (After all, why write this by hand if the computer can do it for us!)
除了 name 字段之外,createSlice 还需要我们传入 reducers 的初始状态值,这样第一次调用的时候就会有一个 state。在这种情况下,我们提供了一个对象,其中 value 字段从 0 开始,status 字段从 'idle' 开始。
¥In addition to the name field, createSlice needs us to pass in the initial state value for the reducers, so that there is a state the first time it gets called. In this case, we're providing an object with a value field that starts off at 0, and a status field that starts off with 'idle'.
我们可以在这里看到三个 reducer 函数,对应于通过单击不同按钮分派的三种不同的操作类型。
¥We can see here that there are three reducer functions, and that corresponds to the three different action types that were dispatched by clicking the different buttons.
createSlice 自动生成与我们编写的 reducer 函数同名的动作创建者。我们可以通过调用其中一个并查看它返回的内容来检查这一点:
¥createSlice automatically generates action creators with the same names as the reducer functions we wrote. We can check that by calling one of them and seeing what it returns:
console.log(counterSlice.actions.increment())
// {type: "counter/increment"}
它还生成切片 reducer 函数,该函数知道如何响应所有这些操作类型:
¥It also generates the slice reducer function that knows how to respond to all these action types:
const newState = counterSlice.reducer(
  { value: 10 },
  counterSlice.actions.increment()
)
console.log(newState)
// {value: 11}
reducer 规则
¥Rules of Reducers
我们之前说过,reducer 必须始终遵循一些特殊规则:
¥We said earlier that reducers must always follow some special rules:
-
他们应该只根据
state和action参数计算新的状态值¥They should only calculate the new state value based on the
stateandactionarguments -
他们不得修改现有的
state。相反,他们必须通过复制现有的state并对复制的值进行更改来进行不可变的更新。¥They are not allowed to modify the existing
state. Instead, they must make immutable updates, by copying the existingstateand making changes to the copied values. -
它们必须是 "pure" - 它们不能执行任何异步逻辑或其他 "副作用"
¥They must be "pure" - they cannot do any asynchronous logic or other "side effects"
但为什么这些规则很重要?有几个不同的原因:
¥But why are these rules important? There are a few different reasons:
-
Redux 的目标之一是使你的代码可预测。当函数的输出仅根据输入参数计算时,更容易理解代码的工作原理并对其进行测试。
¥One of the goals of Redux is to make your code predictable. When a function's output is only calculated from the input arguments, it's easier to understand how that code works, and to test it.
-
另一方面,如果一个函数依赖于其自身外部的变量,或者行为随机,那么你永远不知道运行它时会发生什么。
¥On the other hand, if a function depends on variables outside itself, or behaves randomly, you never know what will happen when you run it.
-
如果函数修改其他值(包括其参数),则可能会意外更改应用的工作方式。这可能是错误的常见来源,例如 "我更新了我的状态,但现在我的 UI 没有在应该更新的时候更新!"
¥If a function modifies other values, including its arguments, that can change the way the application works unexpectedly. This can be a common source of bugs, such as "I updated my state, but now my UI isn't updating when it should!"
-
Redux DevTools 的一些功能取决于你的 reducer 是否正确遵循这些规则
¥Some of the Redux DevTools capabilities depend on having your reducers follow these rules correctly
关于 "不可变的更新" 的规则尤其重要,值得进一步讨论。
¥The rule about "immutable updates" is particularly important, and worth talking about further.
reducer 和不可变更新
¥Reducers and Immutable Updates
之前,我们讨论了 "mutation"(修改现有对象/数组值)和 "immutability"(将值视为无法更改的内容)。
¥Earlier, we talked about "mutation" (modifying existing object/array values) and "immutability" (treating values as something that cannot be changed).
在 Redux 中,我们的 reducer 永远不允许改变原始/当前状态值!
¥In Redux, our reducers are never allowed to mutate the original / current state values!
// ❌ Illegal - by default, this will mutate the state!
state.value = 123
不得在 Redux 中改变状态有几个原因:
¥There are several reasons why you must not mutate state in Redux:
-
它会导致错误,例如 UI 无法正确更新以显示最新值
¥It causes bugs, such as the UI not updating properly to show the latest values
-
这使得理解状态更新的原因和方式变得更加困难
¥It makes it harder to understand why and how the state has been updated
-
这使得编写测试变得更加困难
¥It makes it harder to write tests
-
它破坏了正确使用 "时间旅行调试" 的能力
¥It breaks the ability to use "time-travel debugging" correctly
-
它违背了 Redux 的预期精神和使用模式
¥It goes against the intended spirit and usage patterns for Redux
那么如果我们不能改变原始状态,我们如何返回更新后的状态呢?
¥So if we can't change the originals, how do we return an updated state?
reducer 只能复制原始值,然后可以对副本进行修改。
¥Reducers can only make copies of the original values, and then they can mutate the copies.
// ✅ This is safe, because we made a copy
return {
  ...state,
  value: 123
}
我们已经看到,通过使用 JavaScript 的数组/对象扩展运算符和其他返回原始值副本的函数,我们可以 手动编写不可变的更新。但是,如果你认为 "以这种方式手动编写不可变的更新看起来很难记住并且很难正确执行"...是啊,你说得对!:)
¥We already saw that we can write immutable updates by hand, by using JavaScript's array / object spread operators and other functions that return copies of the original values. However, if you're thinking that "writing immutable updates by hand this way looks hard to remember and do correctly"... yeah, you're right! :)
手动编写不可变的更新逻辑很困难,并且意外改变 reducer 中的状态是 Redux 用户最常犯的错误。
¥Writing immutable update logic by hand is hard, and accidentally mutating state in reducers is the single most common mistake Redux users make.
这就是为什么 Redux 工具包的 createSlice 功能可以让你以更简单的方式编写不可变更新!
¥That's why Redux Toolkit's createSlice function lets you write immutable updates an easier way!
createSlice 内部使用了一个名为 伊梅尔 的库。Immer 使用一种名为 Proxy 的特殊 JS 工具来封装你提供的数据,并让你编写 "mutates" 封装数据的代码。但是,Immer 会跟踪你尝试进行的所有更改,然后使用该更改列表返回一个安全的、不可变的更新值,就像你手动编写了所有不可变的更新逻辑一样。
¥createSlice uses a library called Immer inside. Immer uses a special JS tool called a Proxy to wrap the data you provide, and lets you write code that "mutates" that wrapped data. But, Immer tracks all the changes you've tried to make, and then uses that list of changes to return a safely immutably updated value, as if you'd written all the immutable update logic by hand.
所以,而不是这个:
¥So, instead of this:
function handwrittenReducer(state, action) {
  return {
    ...state,
    first: {
      ...state.first,
      second: {
        ...state.first.second,
        [action.someId]: {
          ...state.first.second[action.someId],
          fourth: action.someValue
        }
      }
    }
  }
}
你可以编写如下所示的代码:
¥You can write code that looks like this:
function reducerWithImmer(state, action) {
  state.first.second[action.someId].fourth = action.someValue
}
这更容易阅读!
¥That's a lot easier to read!
但是,请记住以下非常重要的事情:
¥But, here's something very important to remember:
你只能在 Redux Toolkit 的 createSlice 和 createReducer 中编写 "mutating" 逻辑,因为它们内部使用了 Immer!如果你在没有 Immer 的情况下在代码中编写修改逻辑,它将改变状态并导致错误!
¥You can only write "mutating" logic in Redux Toolkit's createSlice and createReducer because they use Immer inside! If you write mutating logic in your code without Immer, it will mutate the state and cause bugs!
考虑到这一点,让我们回去看看计数器切片中的实际 reducer。
¥With that in mind, let's go back and look at the actual reducers from the counter slice.
export const counterSlice = createSlice({
  name: 'counter',
  initialState,
  // The `reducers` field lets us define reducers and generate associated actions
  reducers: {
    increment: state => {
      // Redux Toolkit allows us to write "mutating" logic in reducers. It
      // doesn't actually mutate the state because it uses the Immer library,
      // which detects changes to a "draft state" and produces a brand new
      // immutable state based off those changes
      state.value += 1
    },
    decrement: state => {
      state.value -= 1
    },
    // Use the PayloadAction type to declare the contents of `action.payload`
    incrementByAmount: (state, action: PayloadAction<number>) => {
      state.value += action.payload
    }
  }
})
我们可以看到,increment reducer 总是会在 state.value 上加 1。因为 Immer 知道我们已经对草稿 state 对象进行了更改,所以我们不必在此处实际返回任何内容。同理,decrement reducer 减 1。
¥We can see that the increment reducer will always add 1 to state.value. Because Immer knows we've made changes to the draft state object, we don't have to actually return anything here. In the same way, the decrement reducer subtracts 1.
在这两个 reducer 中,我们实际上不需要让代码查看 action 对象。无论如何它都会被传入,但由于我们不需要它,所以我们可以跳过将 action 声明为 reducer 的参数。
¥In both of those reducers, we don't actually need to have our code look at the action object. It will be passed in anyway, but since we don't need it, we can skip declaring action as a parameter for the reducers.
另一方面,incrementByAmount reducer 确实需要知道一些事情:它应该添加到计数器值中多少。因此,我们将 reducer 声明为同时具有 state 和 action 参数。在这种情况下,我们知道输入到 "amount" 输入中的金额被放入 action.payload 字段中,因此我们可以将其添加到 state.value。
¥On the other hand, the incrementByAmount reducer does need to know something: how much it should be adding to the counter value. So, we declare the reducer as having both state and action arguments. In this case, we know that the amount we typed into the "amount" input is being put into the action.payload field, so we can add that to state.value.
如果我们使用 TypeScript,我们需要告诉 TS action.payload 的类型是什么。PayloadAction 类型声明“这是一个操作对象,其中 action.payload 的类型是...”无论你提供什么类型。在这种情况下,我们知道 UI 已获取输入到 "amount" 文本框中的数字字符串,将其转换为数字,并尝试使用该值分派操作,因此我们将声明这是 action: PayloadAction<number>。
¥If we're using TypeScript, we need to tell TS what the type of action.payload will be. The PayloadAction type declares that "this is an action object, where the type of action.payload is..." whatever type you supplied. In this case, we know that the UI has taken the numeric string that was typed into the "amount" textbox, converted it into a number, and is trying to dispatch the action with that value, so we'll declare that this is action: PayloadAction<number>.
有关不可变性和编写不可变更新的更多信息,请参阅 "不可变的更新模式" 文档页面 和 React 和 Redux 中的不可变性完整指南。
¥For more information on immutability and writing immutable updates, see the "Immutable Update Patterns" docs page and The Complete Guide to Immutability in React and Redux.
有关使用 Immer 进行 "mutating" 不可变更新的详细信息,请参阅 Immer 文档 和 "使用 Immer 编写 reducer" 文档页面。
¥For details on using Immer for "mutating" immutable updates, see the Immer docs and the "Writing Reducers with Immer" docs page.
其他 Redux 逻辑
¥Additional Redux Logic
Redux 的核心是 Reducer、操作和存储。还有几种常用的 Redux 函数类型。
¥The core of Redux is reducers, actions, and the store. There's a couple additional types of Redux functions that are commonly used as well.
使用选择器读取数据
¥Reading Data with Selectors
我们可以调用 store.getState() 来获取整个当前根状态对象,并像 state.counter.value 一样访问其字段。
¥We can call store.getState() to get the entire current root state object, and access its fields like state.counter.value.
编写 "selector" 函数来为我们执行这些状态字段查找是标准做法。在这种情况下,counterSlice.ts 导出两个可以重复使用的选择器函数:
¥It's standard to write "selector" functions that do those state field lookups for us. In this case, counterSlice.ts exports two selector functions that can be reused:
// Selector functions allows us to select a value from the Redux root state.
// Selectors can also be defined inline in the `useSelector` call
// in a component, or inside the `createSlice.selectors` field.
export const selectCount = (state: RootState) => state.counter.value
export const selectStatus = (state: RootState) => state.counter.status
选择器函数通常以整个 Redux 根状态对象作为参数进行调用。它们可以从根状态读取特定值,或者进行计算并返回新值。
¥Selector functions are normally called with the entire Redux root state object as an argument. They can read out specific values from the root state, or do calculations and return new values.
由于我们使用 TypeScript,我们还需要使用从 store.ts 导出的 RootState 类型来定义每个选择器中 state 参数的类型。
¥Since we're using TypeScript, we also need to use the RootState type that was exported from store.ts to define the type of the state argument in each selector.
请注意,你不必为每个切片中的每个字段创建单独的选择器函数!(这个特定示例确实如此,以展示编写选择器的想法,但我们在 counterSlice.ts 中只有两个字段)相反,在你编写的选择器数量中找到平衡。
¥Note that you don't have to create separate selector functions for every field in every slice! (This particular example did, to show off the idea of writing selectors, but we only had two fields in counterSlice.ts anyway) Instead, find a balance in how many selectors you write.
我们将在 第 4 部分:使用 Redux 数据 中了解有关选择器函数的更多信息,并了解如何在 第 6 部分:表现 中优化它们
¥We'll learn more about selector functions in Part 4: Using Redux Data, and look at how they can be optimized in Part 6: Performance
有关使用选择器函数的原因和方法的详细信息,请参阅 使用选择器导出数据。
¥See Deriving Data with Selectors for a longer look at why and how to use selector functions.
使用 Thunk 编写异步逻辑
¥Writing Async Logic with Thunks
到目前为止,我们应用中的所有逻辑都是同步的。操作被调度,存储运行 reducer 并计算新状态,然后调度函数完成。但是,JavaScript 语言有很多方法来编写异步代码,并且我们的应用通常具有异步逻辑,用于从 API 获取数据等操作。我们需要一个地方来将异步逻辑放入 Redux 应用中。
¥So far, all the logic in our application has been synchronous. Actions are dispatched, the store runs the reducers and calculates the new state, and the dispatch function finishes. But, the JavaScript language has many ways to write code that is asynchronous, and our apps normally have async logic for things like fetching data from an API. We need a place to put that async logic in our Redux apps.
thunk 是一种特定类型的 Redux 函数,可以包含异步逻辑。thunk 是使用两个函数编写的:
¥A thunk is a specific kind of Redux function that can contain asynchronous logic. Thunks are written using two functions:
-
内部 thunk 函数,它将
dispatch和getState作为参数¥An inner thunk function, which gets
dispatchandgetStateas arguments -
外部创建者函数,创建并返回 thunk 函数
¥The outer creator function, which creates and returns the thunk function
从 counterSlice 导出的下一个函数是 thunk 动作创建器的示例:
¥The next function that's exported from counterSlice is an example of a thunk action creator:
// The function below is called a thunk, which can contain both sync and async logic
// that has access to both `dispatch` and `getState`. They can be dispatched like
// a regular action: `dispatch(incrementIfOdd(10))`.
// Here's an example of conditionally dispatching actions based on current state.
export const incrementIfOdd = (amount: number): AppThunk => {
  return (dispatch, getState) => {
    const currentValue = selectCount(getState())
    if (currentValue % 2 === 1) {
      dispatch(incrementByAmount(amount))
    }
  }
}
在此 thunk 中,我们使用 getState() 获取存储的当前根状态值,并使用 dispatch() 调度另一个操作。我们也可以轻松地在此处放置异步逻辑,例如 setTimeout 或 await。
¥In this thunk, we use getState() to get the store's current root state value, and dispatch() to dispatch another action. We could easily put async logic here as well, such as a setTimeout or an await.
我们可以像使用典型 Redux 动作创建器一样使用它们:
¥We can use them the same way we use a typical Redux action creator:
store.dispatch(incrementIfOdd(6))
使用 thunk 需要在创建 Redux 存储时将 redux-thunk 中间件(Redux 的一种插件)添加到其中。幸运的是,Redux Toolkit 的 configureStore 函数已经自动为我们设置了,所以我们可以继续在这里使用 thunk。
¥Using thunks requires that the redux-thunk middleware (a type of plugin for Redux) be added to the Redux store when it's created. Fortunately, Redux Toolkit's configureStore function already sets that up for us automatically, so we can go ahead and use thunks here.
在编写 thunk 时,我们需要确保 dispatch 和 getState 方法的类型正确。我们可以将 thunk 函数定义为 (dispatch: AppDispatch, getState: () => RootState),但在存储文件中为其定义可重用的 AppThunk 类型是标准做法。
¥When writing thunks, we need to make sure the dispatch and getState methods are typed correctly. We could define the thunk function as (dispatch: AppDispatch, getState: () => RootState), but it's standard to define a reusable AppThunk type for that in the store file.
当你需要进行 HTTP 调用以从服务器获取数据时,你可以将该调用放在 thunk 中。这是一个写得较长的示例,因此你可以看到它是如何定义的:
¥When you need to make HTTP calls to fetch data from the server, you can put that call in a thunk. Here's an example that's written a bit longer, so you can see how it's defined:
// the outside "thunk creator" function
const fetchUserById = (userId: string): AppThunk => {
  // the inside "thunk function"
  return async (dispatch, getState) => {
    try {
      dispatch(userPending())
      // make an async call in the thunk
      const user = await userAPI.fetchById(userId)
      // dispatch an action when we get the response back
      dispatch(userLoaded(user))
    } catch (err) {
      // If something went wrong, handle it here
    }
  }
}
Redux Toolkit 包含一个 createAsyncThunk 方法,它可以为你完成所有调度工作。counterSlice.ts 中的下一个函数是一个异步 thunk,它使用计数器值发出模拟 API 请求。当我们分派这个 thunk 时,它将在发出请求之前分派 pending 操作,并在异步逻辑完成后分派 fulfilled 或 rejected 操作。
¥Redux Toolkit includes a createAsyncThunk method that does all of the dispatching work for you. The next function in counterSlice.ts is an async thunk that makes a mock API request with a counter value. When we dispatch this thunk, it will dispatch a pending action before making the request, and either a fulfilled or rejected action after the async logic is done.
// Thunks are commonly used for async logic like fetching data.
// The `createAsyncThunk` method is used to generate thunks that
// dispatch pending/fulfilled/rejected actions based on a promise.
// In this example, we make a mock async request and return the result.
// The `createSlice.extraReducers` field can handle these actions
// and update the state with the results.
export const incrementAsync = createAsyncThunk(
  'counter/fetchCount',
  async (amount: number) => {
    const response = await fetchCount(amount)
    // The value we return becomes the `fulfilled` action payload
    return response.data
  }
)
当你使用 createAsyncThunk 时,你会在 createSlice.extraReducers 中处理其操作。在这种情况下,我们处理所有三种操作类型,更新 status 字段,并更新 value:
¥When you use createAsyncThunk, you handle its actions in createSlice.extraReducers. In this case, we handle all three action types, update the status field, and also update the value:
export const counterSlice = createSlice({
  name: 'counter',
  initialState,
  reducers: {
    // omit reducers
  },
  // The `extraReducers` field lets the slice handle actions defined elsewhere,
  // including actions generated by createAsyncThunk or in other slices.
  extraReducers: builder => {
    builder
      // Handle the action types defined by the `incrementAsync` thunk defined below.
      // This lets the slice reducer update the state with request status and results.
      .addCase(incrementAsync.pending, state => {
        state.status = 'loading'
      })
      .addCase(incrementAsync.fulfilled, (state, action) => {
        state.status = 'idle'
        state.value += action.payload
      })
      .addCase(incrementAsync.rejected, state => {
        state.status = 'failed'
      })
  }
})
如果你好奇我们为什么使用 thunk 进行异步逻辑,请参阅此更深入的解释:
¥If you're curious why we use thunks for async logic, see this deeper explanation:
Detailed Explanation: Thunks and Async Logic
我们知道我们不允许在 reducer 中放置任何类型的异步逻辑。但是,这种逻辑必须存在于某个地方。
¥We know that we're not allowed to put any kind of async logic in reducers. But, that logic has to live somewhere.
如果我们可以访问 Redux 存储,我们可以编写一些异步代码并在完成后调用 store.dispatch():
¥If we had access to the Redux store, we could write some async code and call store.dispatch() when we're done:
const store = configureStore({ reducer: counterReducer })

setTimeout(() => {
  store.dispatch(increment())
}, 250)
但是,在真正的 Redux 应用中,我们不允许将存储导入到其他文件中,尤其是在我们的 React 组件中,因为这使得代码更难测试和重用。
¥But, in a real Redux app, we're not allowed to import the store into other files, especially in our React components, because it makes that code harder to test and reuse.
此外,我们经常需要编写一些异步逻辑,我们知道这些逻辑最终将与某个存储一起使用,但我们不知道哪个存储。
¥In addition, we often need to write some async logic that we know will be used with some store, eventually, but we don't know which store.
Redux 存储可以使用 "中间件" 进行扩展,"中间件" 是一种可以添加额外功能的附加组件或插件。使用中间件的最常见原因是让你编写具有异步逻辑的代码,但同时仍与存储进行通信。他们还可以修改存储,以便我们可以调用 dispatch() 并传入不是普通操作对象的值,例如函数或 Promise。
¥The Redux store can be extended with "middleware", which are a kind of add-on or plugin that can add extra abilities. The most common reason to use middleware is to let you write code that can have async logic, but still talk to the store at the same time. They can also modify the store so that we can call dispatch() and pass in values that are not plain action objects, like functions or Promises.
Redux Thunk 中间件修改了 store,让你可以将函数传递到 dispatch 中。事实上,它足够短,我们可以将其粘贴到这里:
¥The Redux Thunk middleware modifies the store to let you pass functions into dispatch. In fact, it's short enough we can paste it here:
const thunkMiddleware =
  ({ dispatch, getState }) =>
  next =>
  action => {
    if (typeof action === 'function') {
      return action(dispatch, getState)
    }

    return next(action)
  }
它查看传递给 dispatch 的 "action" 是否实际上是一个函数而不是一个普通的操作对象。如果它实际上是一个函数,它将调用该函数并返回结果。否则,由于这必须是一个操作对象,因此它将操作转发到存储。
¥It looks to see if the "action" that was passed into dispatch is actually a function instead of a plain action object. If it's actually a function, it calls the function, and returns the result. Otherwise, since this must be an action object, it passes the action forward to the store.
这为我们提供了一种编写我们想要的任何同步或异步代码的方法,同时仍然可以访问 dispatch 和 getState。
¥This gives us a way to write whatever sync or async code we want, while still having access to dispatch and getState.
我们会看到 xx1 中使用了 thunk
¥We'll see thunks being used in Part 5: Async Logic and Data Fetching
请参阅 Redux Thunk 文档、帖子 thunk 到底是什么? 和 "为什么我们使用中间件进行异步?" 上的 Redux FAQ 条目 了解更多信息。
¥See the Redux Thunk docs, the post What the heck is a thunk? and the Redux FAQ entry on "why do we use middleware for async?" for more information.
React 计数器组件
¥The React Counter Component
之前,我们看到了独立的 React <Counter> 组件是什么样子的。我们的 React+Redux 应用有一个类似的 <Counter> 组件,但它做了一些不同的事情。
¥Earlier, we saw what a standalone React <Counter> component looks like. Our React+Redux app has a similar <Counter> component, but it does a few things differently.
我们首先查看 Counter.tsx 组件文件:
¥We'll start by looking at the Counter.tsx component file:
import { useState } from 'react'

// Use pre-typed versions of the React-Redux
// `useDispatch` and `useSelector` hooks
import { useAppDispatch, useAppSelector } from '@/app/hooks'
import {
  decrement,
  increment,
  incrementAsync,
  incrementByAmount,
  incrementIfOdd,
  selectCount,
  selectStatus
} from './counterSlice'

import styles from './Counter.module.css'

export function Counter() {
  const dispatch = useAppDispatch()
  const count = useAppSelector(selectCount)
  const status = useAppSelector(selectStatus)
  const [incrementAmount, setIncrementAmount] = useState('2')

  const incrementValue = Number(incrementAmount) || 0

  return (
    <div>
      <div className={styles.row}>
        <button
          className={styles.button}
          aria-label="Decrement value"
          onClick={() => {
            dispatch(decrement())
          }}
        >
          -
        </button>
        <span aria-label="Count" className={styles.value}>
          {count}
        </span>
        <button
          className={styles.button}
          aria-label="Increment value"
          onClick={() => {
            dispatch(increment())
          }}
        >
          +
        </button>
        {/* omit additional rendering output here */}
      </div>
    </div>
  )
}
与前面的简单 React 示例一样,我们有一个名为 Counter 的函数组件,它将一些数据存储在 useState 钩子中。
¥Like with the earlier plain React example, we have a function component called Counter, that stores some data in a useState hook.
然而,在我们的组件中,我们看起来并没有将实际的当前计数器值存储为状态。有一个名为 count 的变量,但它不是来自 useState 钩子。
¥However, in our component, it doesn't look like we're storing the actual current counter value as state. There is a variable called count, but it's not coming from a useState hook.
虽然 React 包含多个内置钩子(如 useState 和 useEffect),但其他库可以创建自己的 定制钩子,使用 React 的钩子来构建自定义逻辑。
¥While React includes several built-in hooks like useState and useEffect, other libraries can create their own custom hooks that use React's hooks to build custom logic.
React-Redux 库 有 一组自定义钩子,允许你的 React 组件与 Redux 存储交互。
¥The React-Redux library has a set of custom hooks that allow your React component to interact with a Redux store.
用 useSelector 读取数据
¥Reading Data with useSelector
首先,useSelector 钩子让我们的组件从 Redux 存储状态中提取所需的任何数据。
¥First, the useSelector hook lets our component extract whatever pieces of data it needs from the Redux store state.
之前,我们看到我们可以编写 "selector" 函数,它以 state 作为参数并返回状态值的某些部分。特别是,我们的 counterSlice.ts 文件是 导出 selectCount 和 selectStatus
¥Earlier, we saw that we can write "selector" functions, which take state as an argument and return some part of the state value. In particular, our counterSlice.ts file is exporting selectCount and selectStatus
如果我们有权访问 Redux 存储,我们可以检索当前计数器值,如下所示:
¥If we had access to a Redux store, we could retrieve the current counter value as:
const count = selectCount(store.getState())
console.log(count)
// 0
我们的组件无法直接与 Redux 存储对话,因为我们不允许将其导入组件文件中。但是,useSelector 负责在幕后为我们与 Redux 存储进行对话。如果我们传入一个选择器函数,它会为我们调用 someSelector(store.getState()),并返回结果。
¥Our components can't talk to the Redux store directly, because we're not allowed to import it into component files. But, useSelector takes care of talking to the Redux store behind the scenes for us. If we pass in a selector function, it calls someSelector(store.getState()) for us, and returns the result.
因此,我们可以通过执行以下操作来获取当前存储计数器值:
¥So, we can get the current store counter value by doing:
const count = useSelector(selectCount)
我们也不必只使用已经导出的选择器。例如,我们可以编写一个选择器函数作为 useSelector 的内联参数:
¥We don't have to only use selectors that have already been exported, either. For example, we could write a selector function as an inline argument to useSelector:
const countPlusTwo = useSelector((state: RootState) => state.counter.value + 2)
每当一个操作被调度并且 Redux 存储被更新时,useSelector 就会重新运行我们的选择器函数。如果选择器返回的值与上次不同,useSelector 将确保我们的组件使用新值重新渲染。
¥Any time an action has been dispatched and the Redux store has been updated, useSelector will re-run our selector function. If the selector returns a different value than last time, useSelector will make sure our component re-renders with the new value.
使用 useDispatch 调度操作
¥Dispatching Actions with useDispatch
同样,我们知道如果我们有权访问 Redux 存储,我们可以使用操作创建者来分派操作,例如 store.dispatch(increment())。由于我们无权访问存储本身,因此我们需要某种方法来访问 dispatch 方法。
¥Similarly, we know that if we had access to a Redux store, we could dispatch actions using action creators, like store.dispatch(increment()). Since we don't have access to the store itself, we need some way to have access to just the dispatch method.
useDispatch 钩子为我们完成了这个任务,并为我们提供了来自 Redux 存储的实际 dispatch 方法:
¥The useDispatch hook does that for us, and gives us the actual dispatch method from the Redux store:
const dispatch = useDispatch()
从那里,当用户执行诸如单击按钮之类的操作时,我们可以调度操作:
¥From there, we can dispatch actions when the user does something like clicking on a button:
<button
  className={styles.button}
  aria-label="Increment value"
  onClick={() => {
    dispatch(increment())
  }}
>
  +
</button>
定义预输入的 React-Redux 钩子
¥Defining Pre-Typed React-Redux Hooks
默认情况下,useSelector 钩子需要你为每个选择器函数声明 (state: RootState)。我们可以创建 useSelector 和 useDispatch 钩子的预输入版本,这样我们就不必每次都重复 : RootState 部分。
¥By default the useSelector hook needs you to declare (state: RootState) for every selector function. We can create pre-typed versions of the useSelector and useDispatch hooks so that we don't have to keep repeating the : RootState part every time.
import { useDispatch, useSelector } from 'react-redux'
import type { AppDispatch, RootState } from './store'

// Use throughout your app instead of plain `useDispatch` and `useSelector`
export const useAppDispatch = useDispatch.withTypes<AppDispatch>()
export const useAppSelector = useSelector.withTypes<RootState>()
然后,我们可以将 useAppSelector 和 useAppDispatch 钩子导入我们自己的组件并使用它们代替原始版本。
¥Then, we can import the useAppSelector and useAppDispatch hooks into our own components and use them instead of the original versions.
组件状态和形式
¥Component State and Forms
现在你可能想知道,"我是否总是需要将所有应用的状态放入 Redux 存储中?"
¥By now you might be wondering, "Do I always have to put all my app's state into the Redux store?"
答案是不。应用所需的全局状态应该放在 Redux 存储中。仅在一处需要的状态应保留在组件状态中。
¥The answer is NO. Global state that is needed across the app should go in the Redux store. State that's only needed in one place should be kept in component state.
在此示例中,我们有一个输入文本框,用户可以在其中输入要添加到计数器的下一个数字:
¥In this example, we have an input textbox where the user can type in the next number to be added to the counter:
const [incrementAmount, setIncrementAmount] = useState('2')

const incrementValue = Number(incrementAmount) || 0

// later
return (
  <div className={styles.row}>
    <input
      className={styles.textbox}
      aria-label="Set increment amount"
      value={incrementAmount}
      onChange={e => setIncrementAmount(e.target.value)}
    />
    <button
      className={styles.button}
      onClick={() => dispatch(incrementByAmount(incrementValue))}
    >
      Add Amount
    </button>
    <button
      className={styles.asyncButton}
      onClick={() => dispatch(incrementAsync(incrementValue))}
    >
      Add Async
    </button>
  </div>
)
我们可以通过在输入的 onChange 处理程序中分派一个操作并将其保存在我们的化简器中,将当前数字字符串保留在 Redux 存储中。但是,这并没有给我们带来任何好处。唯一使用文本字符串的地方是此处,在 <Counter> 组件中。(当然,这个例子中只有一个其他组件:<App>。但即使我们有一个包含许多组件的更大的应用,也只有 <Counter> 关心这个输入值。)
¥We could keep the current number string in the Redux store, by dispatching an action in the input's onChange handler and keeping it in our reducer. But, that doesn't give us any benefit. The only place that text string is used is here, in the <Counter> component. (Sure, there's only one other component in this example: <App>. But even if we had a larger application with many components, only <Counter> cares about this input value.)
因此,将该值保留在 <Counter> 组件的 useState 钩子中是有意义的。
¥So, it makes sense to keep that value in a useState hook here in the <Counter> component.
同样,如果我们有一个名为 isDropdownOpen 的布尔标志,应用中的其他组件不会关心它 - 它确实应该保留在该组件的本地。
¥Similarly, if we had a boolean flag called isDropdownOpen, no other components in the app would care about that - it should really stay local to this component.
在 React + Redux 应用中,你的全局状态应位于 Redux 存储中,而本地状态应保留在 React 组件中。
¥In a React + Redux app, your global state should go in the Redux store, and your local state should stay in React components.
如果你不确定将某些内容放在哪里,可以使用以下一些常见的经验规则来确定应将哪种数据放入 Redux 中:
¥If you're not sure where to put something, here are some common rules of thumb for determining what kind of data should be put into Redux:
-
应用的其他部分是否关心这些数据?
¥Do other parts of the application care about this data?
-
你是否需要能够基于此原始数据创建进一步的派生数据?
¥Do you need to be able to create further derived data based on this original data?
-
是否使用相同的数据来驱动多个组件?
¥Is the same data being used to drive multiple components?
-
能够将此状态恢复到给定时间点(即时间旅行调试)对你有价值吗?
¥Is there value to you in being able to restore this state to a given point in time (ie, time travel debugging)?
-
你是否想要缓存数据(即,如果状态已经存在,则使用状态而不是重新请求它)?
¥Do you want to cache the data (ie, use what's in state if it's already there instead of re-requesting it)?
-
你是否希望在热重载 UI 组件时保持这些数据一致(交换时可能会丢失其内部状态)?
¥Do you want to keep this data consistent while hot-reloading UI components (which may lose their internal state when swapped)?
这也是一般如何思考 Redux 中表单的一个很好的例子。大多数表单状态可能不应该保存在 Redux 中。相反,在编辑数据时将数据保留在表单组件中,然后在用户完成后分派 Redux 操作来更新存储。
¥This is also a good example of how to think about forms in Redux in general. Most form state probably shouldn't be kept in Redux. Instead, keep the data in your form components as you're editing it, and then dispatch Redux actions to update the store when the user is done.
在我们继续之前,还有一件事需要注意:还记得 counterSlice.ts 发出的 incrementAsync 的声音吗?我们在此组件中使用它。请注意,我们使用它的方式与调度其他正常动作创建者的方式相同。该组件不关心我们是否正在分派正常操作或启动某些异步逻辑。它只知道当你单击该按钮时,它会发送一些内容。
¥One other thing to note before we move on: remember that incrementAsync thunk from counterSlice.ts? We're using it here in this component. Notice that we use it the same way we dispatch the other normal action creators. This component doesn't care whether we're dispatching a normal action or starting some async logic. It only knows that when you click that button, it dispatches something.
提供存储
¥Providing the Store
我们已经看到我们的组件可以使用 useSelector 和 useDispatch 钩子与 Redux 存储进行通信。但是,由于我们没有导入 store,那些 hooks 如何知道要与哪个 Redux store 通信呢?
¥We've seen that our components can use the useSelector and useDispatch hooks to talk to the Redux store. But, since we didn't import the store, how do those hooks know what Redux store to talk to?
现在我们已经看到了该应用的所有不同部分,是时候回到该应用的起点,看看拼图的最后几部分是如何组合在一起的。
¥Now that we've seen all the different pieces of this application, it's time to circle back to the starting point of this application and see how the last pieces of the puzzle fit together.
import React from 'react'
import { createRoot } from 'react-dom/client'
import { Provider } from 'react-redux'

import App from './App'
import { store } from './app/store'

import './index.css'

const container = document.getElementById('root')!
const root = createRoot(container)

root.render(
  <React.StrictMode>
    <Provider store={store}>
      <App />
    </Provider>
  </React.StrictMode>
)
我们总是必须调用 root.render(<App />) 来告诉 React 开始渲染我们的根 <App> 组件。为了让 useSelector 这样的钩子正常工作,我们需要使用一个名为 <Provider> 的组件在后台传递 Redux 存储,以便他们可以访问它。
¥We always have to call root.render(<App />) to tell React to start rendering our root <App> component. In order for our hooks like useSelector to work right, we need to use a component called <Provider> to pass down the Redux store behind the scenes so they can access it.
我们已经在 app/store.ts 创建了我们的存储,所以我们可以在这里导入它。然后,我们将 <Provider> 组件放在整个 <App> 周围,并传入 store:<Provider store={store}>。
¥We already created our store in app/store.ts, so we can import it here. Then, we put our <Provider> component around the whole <App>, and pass in the store: <Provider store={store}>.
现在,任何调用 useSelector 或 useDispatch 的 React 组件都将与我们提供给 <Provider> 的 Redux 存储进行通信。
¥Now, any React components that call useSelector or useDispatch will be talking to the Redux store we gave to the <Provider>.
你学到了什么
¥What You've Learned
尽管计数器示例应用非常小,但它显示了 React + Redux 应用协同工作的所有关键部分。以下是我们介绍的内容:
¥Even though the counter example app is pretty small, it showed all the key pieces of a React + Redux app working together. Here's what we covered:
-
我们可以使用 Redux Toolkit
configureStoreAPI 创建 Redux 存储¥We can create a Redux store using the Redux Toolkit
configureStoreAPI-
configureStore接受reducer函数作为命名参数¥
configureStoreaccepts areducerfunction as a named argument -
configureStore自动设置存储并具有良好的默认设置¥
configureStoreautomatically sets up the store with good default settings
-
-
Redux 逻辑通常组织成名为 "切片" 的文件
¥Redux logic is typically organized into files called "slices"
-
"slice" 包含与 Redux 状态的特定功能/部分相关的 reducer 逻辑和操作
¥A "slice" contains the reducer logic and actions related to a specific feature / section of the Redux state
-
Redux Toolkit 的
createSliceAPI 为你提供的每个单独的缩减器函数生成操作创建者和操作类型¥Redux Toolkit's
createSliceAPI generates action creators and action types for each individual reducer function you provide
-
-
Redux reducer 必须遵循特定规则
¥Redux reducers must follow specific rules
-
应该只根据
state和action参数计算新的状态值¥Should only calculate a new state value based on the
stateandactionarguments -
必须通过复制现有状态进行不可变更新
¥Must make immutable updates by copying the existing state
-
不能包含任何异步逻辑或其他 "副作用"
¥Cannot contain any asynchronous logic or other "side effects"
-
Redux Toolkit 的
createSliceAPI 使用 Immer 允许 "mutating" 不可变更新¥Redux Toolkit's
createSliceAPI uses Immer to allow "mutating" immutable updates
-
-
从状态中读取值是使用名为 "selectors" 的函数完成的
¥Reading values from the state is done with functions called "selectors"
-
选择器接受
(state: RootState)作为其参数,并从状态返回一个值,或派生一个新值¥Selectors accept
(state: RootState)as their argument and either return a value from the state, or derive a new value -
选择器可以写在切片文件中,也可以内联在
useSelector钩子中¥Selectors can be written in slice files, or inline in the
useSelectorhook
-
-
异步逻辑通常用称为 "thunks" 的特殊函数编写
¥Async logic is typically written in special functions called "thunks"
-
Thunk 接收
dispatch和getState作为参数¥Thunks receive
dispatchandgetStateas arguments -
Redux Toolkit 默认启用
redux-thunk中间件¥Redux Toolkit enables the
redux-thunkmiddleware by default
-
-
React-Redux 允许 React 组件与 Redux 存储交互
¥React-Redux allows React components to interact with a Redux store
-
使用
<Provider store={store}>封装应用使所有组件都可以使用存储¥Wrapping the app with
<Provider store={store}>enables all components to use the store -
useSelector钩子让 React 组件从 Redux 存储中读取值¥The
useSelectorhook lets React components read values from the Redux store -
useDispatch钩子让组件分派动作¥The
useDispatchhook lets components dispatch actions -
对于 TS 使用,我们创建预类型化的
useAppSelector和useAppDispatch钩子¥For TS usage, we create pre-typed
useAppSelectoranduseAppDispatchhooks -
全局状态应该放在 Redux 存储中,本地状态应该放在 React 组件中
¥Global state should go in the Redux store, local state should stay in React components
-
下一步是什么?
¥What's Next?
现在你已经了解了 Redux 应用的所有功能,是时候编写你自己的应用了!在本教程的其余部分中,你将构建一个使用 Redux 的更大的示例应用。在此过程中,我们将介绍正确使用 Redux 所需了解的所有关键思想。
¥Now that you've seen all the pieces of a Redux app in action, it's time to write your own! For the rest of this tutorial, you'll be building a larger example app that uses Redux. Along the way, we'll cover all the key ideas you need to know to use Redux the right way.
继续学习 第 3 部分:基本 Redux 数据流 以开始构建示例应用。
¥Continue on to Part 3: Basic Redux Data Flow to get started building the example app.